---
url: >-
/statelake/tutorials/tutorial-exercises/tutorial-4-extracting-xml-invoices-out-of-a-database.md
---
# Tutorial 4: Extracting XML Invoices Out Of A Database
This tutorial is the largest and most complex in this series so far. It calls on all of the skills and knowledge that you have gained as you have worked through the tutorials up to this point, and illustrates many of the advanced features and functionality of the **Statelake** software. It is recommended that are familiar and comfortable with the contents of the previous tutorials before proceeding.
This tutorial illustrates a real-life situation, where a business sends out electronic invoices to its customers, records are extracted from a source database into a destination .XML file, and two-tier structures will be mapped – invoice headers and invoice lines. This tutorial will also introduce the Trading Community functionality and ways of marking extracted records.
The configuration for this tutorial will be covered in phases. Firstly, the basic functionality will be implemented to the point of a working **Action**. Secondly, additional functionality will be discussed and added.
Each step should be fully completed before progressing on to the next. By the end of this tutorial you will have the necessary skills and knowledge to:
* Map a two-tier database structure into a two-tier file structure
* Join several tables together in the same **DB Dataview**
* Expose the **DB Definition** search criteria to the user
* Write out a single file per transaction
* Create and use **Trading Community**
* Create and use **Outbound Transports**
* Mark transactions as extracted, using settings within the **DB Definition**
It is most important before you proceed, to check and ensure that all of the training files have been copied as instructed. These files are an essential part of this tutorial.
## XML Files
XML files differ from flat data files because they contain information scattered within the file that relates to the file structure, interspersed with the actual data values. This format tends to make XML files larger in size, but can also make them easier to read.
For example, an order number in an XML file might appear as:
```xml
12345
```
XML also has the advantage of using schema files. These are separate from the data files, and describe the structure of the incoming XML data file, along with any validation rules that each data file must comply with.
The format of these schema files determine how the incoming data is translated and typically have a file name ending with .xsd, whereas XML data files have an .xml file extension.
The following examples show a simple XSD schema file, and the corresponding XML data file.
### Simple XML Schema Definition (.XSD) For An Order
```xml
```
### Simple XML Data File (.XML) For The Same Order
```xml
12345
26-10-2011
1
ABC
10
2
XYZ
3
```
## Where The Data Is - Database Connections
To extract invoice data out of a database into an XML file, it is necessary to configure the required connections for the database and file, the definitions for the database and file, a **Map** and an **Action**. The Exo database will again be used as our source, so the **DB Connection** into **MYOB Exo** that has already been established in earlier tutorials can be used.
The first step is to make sure that the **Statelake** module **Designer** for your selected configuration **Statelake_Training** is open. An expanded structure tree is displayed on the left side of the screen.
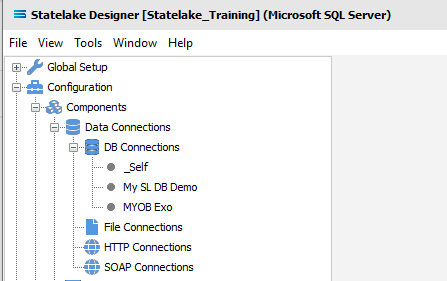
1. Follow the path **Configuration > Components > Data Connections > DB Connections**. Click on **DB Connections** and **MYOB Exo** should be displayed.
## Where The Data Is - File Connections
As we know, the **File Connections** module also sits under the **Data Connections** umbrella, and is the configuration module that points to a specified file directory that will hold the output or destination file. In this tutorial, the output file will be an Exo database. As we did for Tutorial Three, a new file connection for the input file needs to be created.
**Designer** will already be open. If not, open the **Statelake** module **Designer** for your selected configuration, **Statelake_Training**. An expanded structure tree is displayed on the left side of the screen.
### Create File Connection
1. Follow the path **Configuration > Components > Data Connections > File Connections**. Right‑click on **File Connections** and choose **New** from the drop-down list.
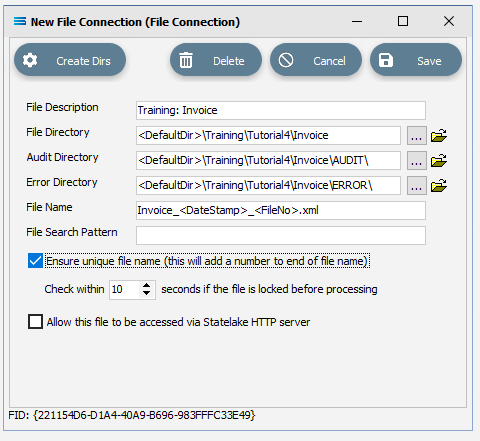
2. An item called **New File Connection** will appear in the structure tree. In the **New File Connection** window the following information is to be entered.
1. **File Description** – the name that is meaningful and best describes the output file. In this tutorial it will be **Training: Invoice**.
2. **File Directory** – the directory location for the destination output file. Enter \\Training\Tutorial4\Invoice and use the tab key to proceed out of the field.
::: info
The \ tag refers to the default file path already set-up within the **Statelake General Setup**, under **Global Setup**. By default, **C:\ProgramData\FlowSoftware\Statelake\Files** will be the file directory path referenced by this tag.
:::
c. **Audit Directory** – will be automatically populated when you tab out of **File Directory**.
d. **Error Directory** – will be automatically populated when you tab out of **File Directory**.
::: info
**Statelake** used two sub-directories to manage files - AUDIT and ERROR. When a file is successfully processed in, or successfully sent after being written out, it is moved into the AUDIT directory. If an error occurs during file processing, the file is moved into the ERROR directory.
:::
e. **File Name** – is the actual name of the output file. We will use special tags inside the file name. \ is a special tag that will be replaced by the current date and time when the file is created. \ is a special tag that will be replaced by the number of the file being written in the execution of that particular **Action**. Type in **Invoice\_\\_\.xml**.
f. **File Search Pattern** - used by **Statelake** when files are being read. Leave this field blank.
g. **Ensure Unique File Name** – tick this box to add a number to the file name to ensure that the file name will be unique and will not overwrite a file already in the output folder. In this instance, leave this unticked.
h. **Allow This File To Be Accessed** – for this tutorial leave unticked.
3. If the sub-directories you have specified do not yet exist or you are not sure whether they exist, you will need to check by clicking on the button **Create Dirs** which is located on the top left of the window. If the directories do not exist, they will be created, else they will be confirmed as current and available by display of the pop-up message “**File connection directories checked/created successfully**”.
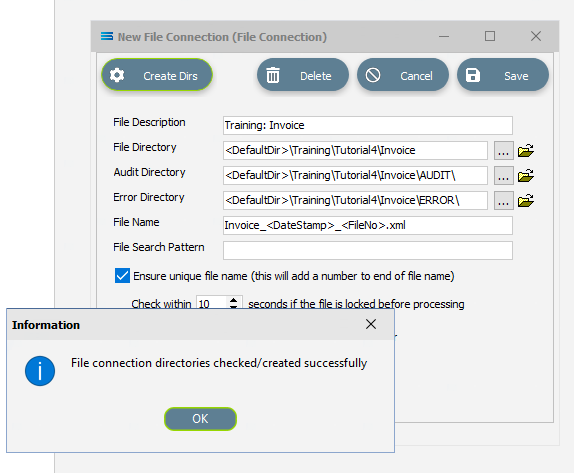
4. Click **OK** in response to the successful creation message.
5. Click **Save** when all details are entered to save and close the module.
The **File Connection** named **Training: Invoice** will now appear in the structure tree under **Configuration > Components > Data Connections > FIle Connections**.
## What The Data Is - Creating DB Definitions
You should now be familiar with **DB Definition** sitting under the **Data Definitions** umbrella,
**DB Definition** tells **Statelake** what the data is, so that the proper fields can be accessed and the data extracted correctly, which means defining the exact information to be extracted, and also identifying how the output file is to be constructed.
For this tutorial, a database or **DB Definition** is created for extracting the invoice data.
**Designer** will already be open. If not, open the **Statelake** module **Designer** for the selected configuration **Statelake_Training**. An expanded structure tree is displayed on the left side of the screen.
### Create DB Definition
1. Follow the path **Configuration > Components > Data Definitions > DB Definitions**. Right‑click on **DB Definitions** and choose **New** from the drop-down list.
2. An item called **New DB Definition** will appear in the structure tree. In the **New DB Definition** window the following information is to be entered.
1. **DB Definition Name** – the meaningful name in this instance will be **Exo: Invoices Out**.
2. **DB Connections** – this is the name of the source database, identified in the **DB Connections** module. Right-click anywhere in the box to see the **Add** pop-up, follow the arrow and select **MYOB Exo**.
3. **Transaction Identification** – leave with the defaults as set.
4. **Duplicate Record Handling** – leave with the defaults as set.
5. **Disable Automatic String Trim** – leave with the default as set. This field will be ticked.
6. **Save Null Fields as Blank Strings** – leave with the default as set.
7. **Disable SQL Transactions** – leave with the default as set.
8. **Save Blank String Fields as Nulls** – leave with the default as set.
9. **Include Null Values in SQL statement** – leave with the default as set.
3. Click **Design** in the top left of the window.
### Create DB Dataview Query
1. A blank definition designer canvas will display. To start creating your query, click on the **File** menu in the top left corner, and choose **New** (or use the Ctrl+N).
2. The **New Items** window will open and only one item called **DB Dataview** will be displayed.
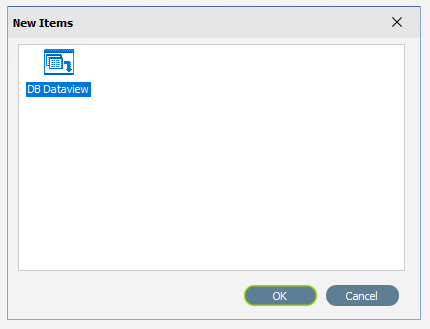
Click **OK** to add **DB Dataview**.
3. The **Query Designer** window will open.
4. The first tab in the **Query Designer** is **Tables**.
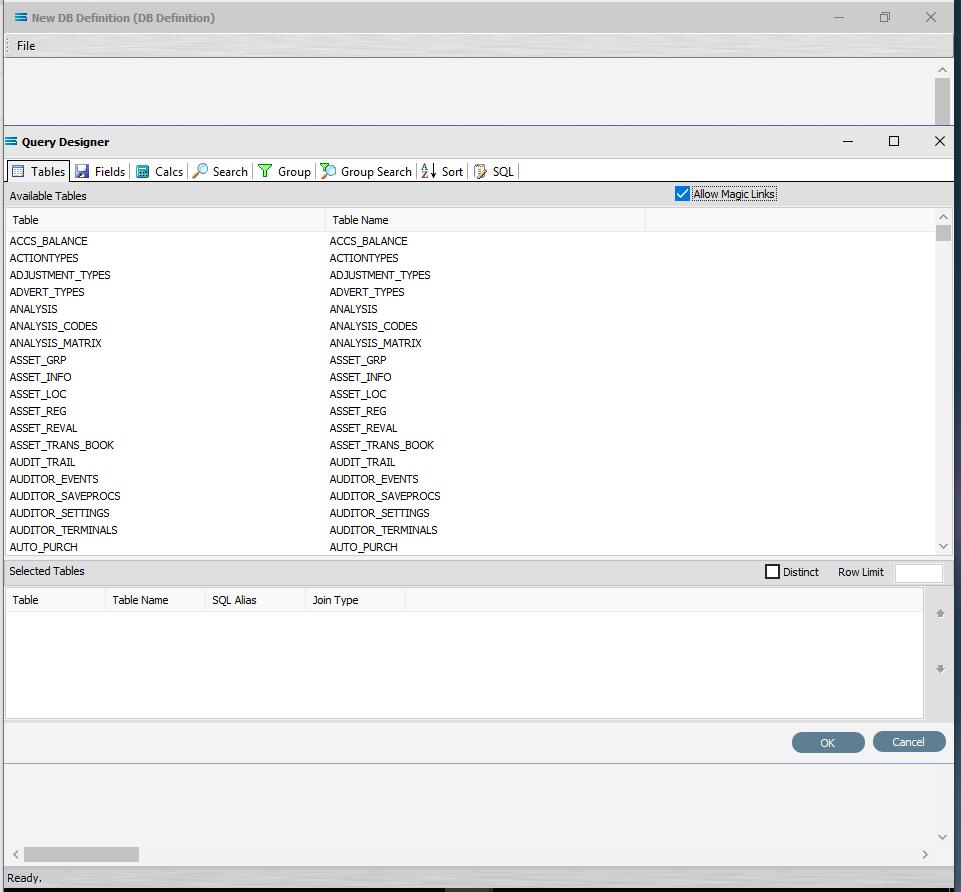
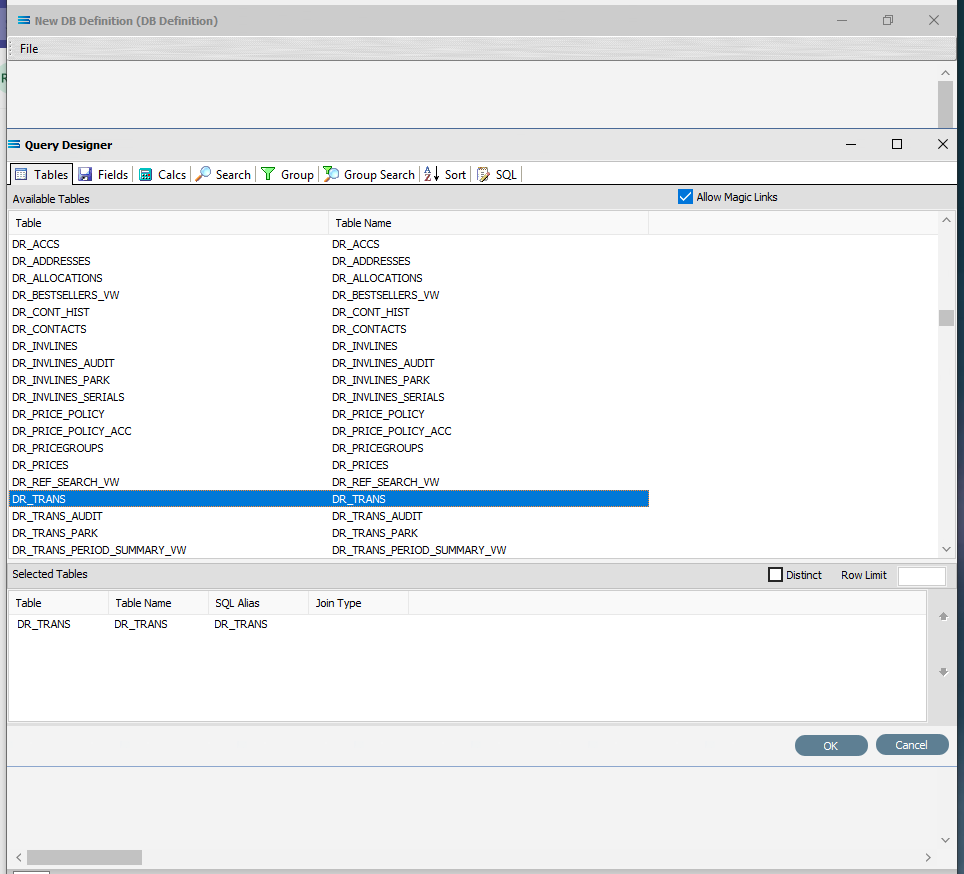
Scroll down the available tables to **DR_TRANS** (Debtor Transactions) and double-click to select it. It will appear in the lower pane as a selected table, but will also remain visible in the **Available Tables** list.
5. Move to the **Fields** tab, and add the following fields to the query by double-clicking on them:
1. **SEQNO** (sequence number)
2. **TRANSDATE** (transaction date)
3. **ACCNO**
4. **INVNO** (invoice number)
5. **REF1**
6. **SUBTOTAL**
7. **TAXTOTAL**
8. **CUSTORDERNO. CUSTORDERNO** is located well down the list. Click on **Field Alias** to sort. In alphabetic sequence.
6. As you select fields from the **Available Fields** pane, they will appear in the **Selected Fields** pane, and disappear from the **Available Fields** pane.
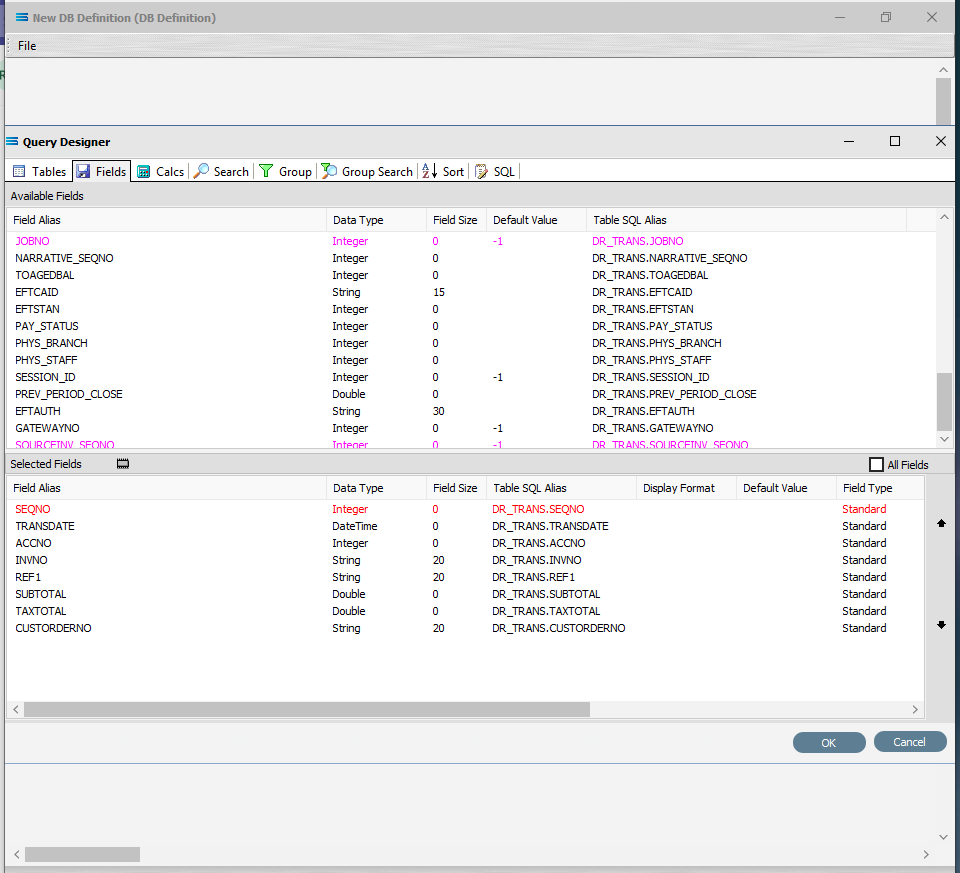
As already observed in previous tutorials, if you select the wrong field, simply double-click on it as a selected field and it will be de-selected.
::: info
The fields are colour coded in the **Query Designer**. **RED** indicates that the field is either calculated or is an automatically generated IDENTITY type such as SEQNO. **PINK** indicates that the field does not allow null values.
:::
7. Click **OK** at the bottom-right of the **Query Designer** to save the dataview and return to the definition canvas. The configured dataview will display, listing all of the fields that were selected in the previous step. This box can also be expanded as required.
### Join Another Table To Dataview Query
1. Now the table **DR_ACCS** is to be joined to this current **DR_TRANS** dataview. The **DR_ACCS** table holds the additional details about the customers that are required to produce the invoice file. Click on the **Tables** toolbar button on the **DR_TRANS** dataview to go to the **Tables** tab in the **Query Designer**.
2. Find and double-click on the **DR_ACCS** table to add it to the current query. The **Join Table** window will immediately pop up.
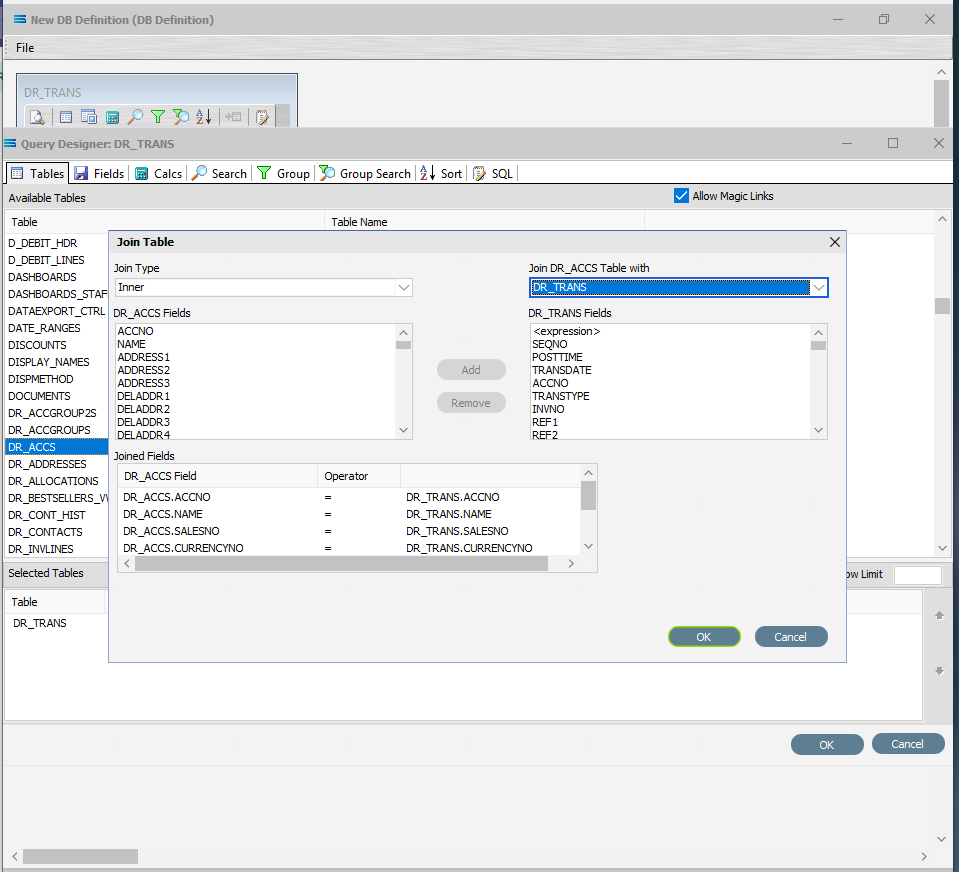
3. At the very bottom of this **Join Table** pop-up window, there is a section labelled as **Joined Fields**, with a list of all of the available fields that can be found in the **DR_ACCS** table listed under the **DR_ACCS Field** column. You will notice that all of the field names are prefixed by the name of the table, with a full-stop as a separator.
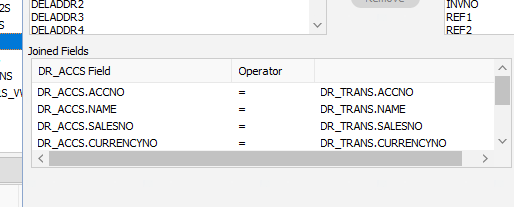
Remove all of the fields listed except for **DR_ACCS.ACCNO** by double-clicking on each field name in turn, or by highlighting the field name and then clicking on the **Remove** button. This button will be greyed out until a field is highlighted.
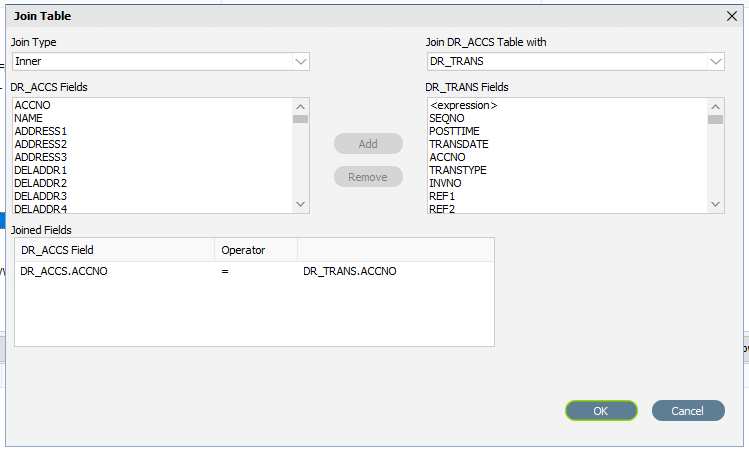
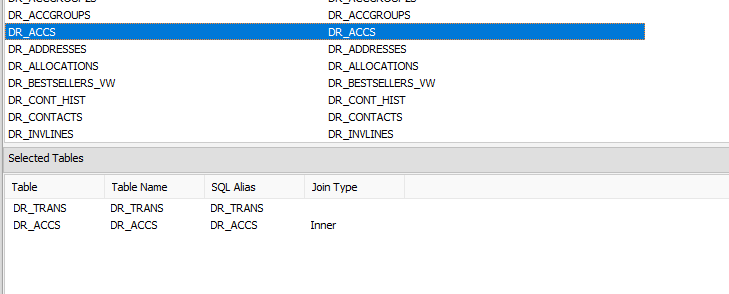
Click **OK** to save the selection and close the window. Having returned to the **Query Designer** window, you will see the table **DR_ACCS** appear under the **Selected Tables** area with a **Join Type** of **Inner**.
4. Move to the **Fields** tab. All of the fields from the **DR_ACCS** table have been appended to the **Available Fields** list, and are identified by the name listed under the very right-hand **Table SQL Alias** column, with the table name prefixing the field name. The table name and field name are separated by a full stop.
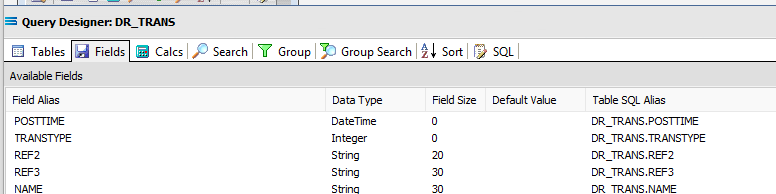
Scroll down the list until to reach the fields from the **DR_ACCS** table.
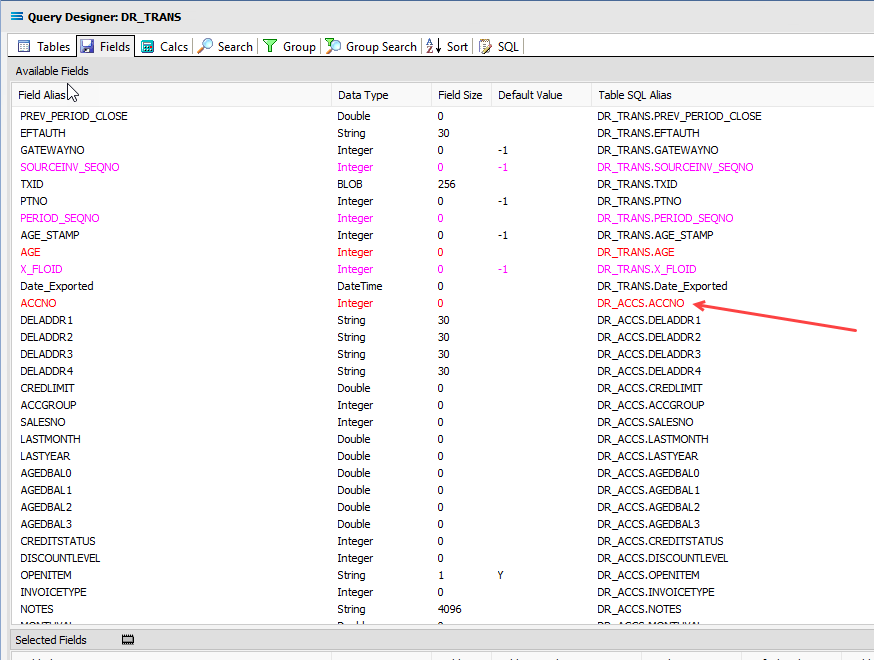
Add the following fields from **DR_ACCS** to the query by double-clicking on them to add them to the **Selected Fields** pane:
1. **NAME**
2. **ADDRESS1**
3. **ADDRESS2**
4. **ADDRESS3**
5. **PHONE**
6. **FAX**
7. **EMAIL**
5. You will see the fields as now selected, are easily identifiable by their **Table SQL Alias**.
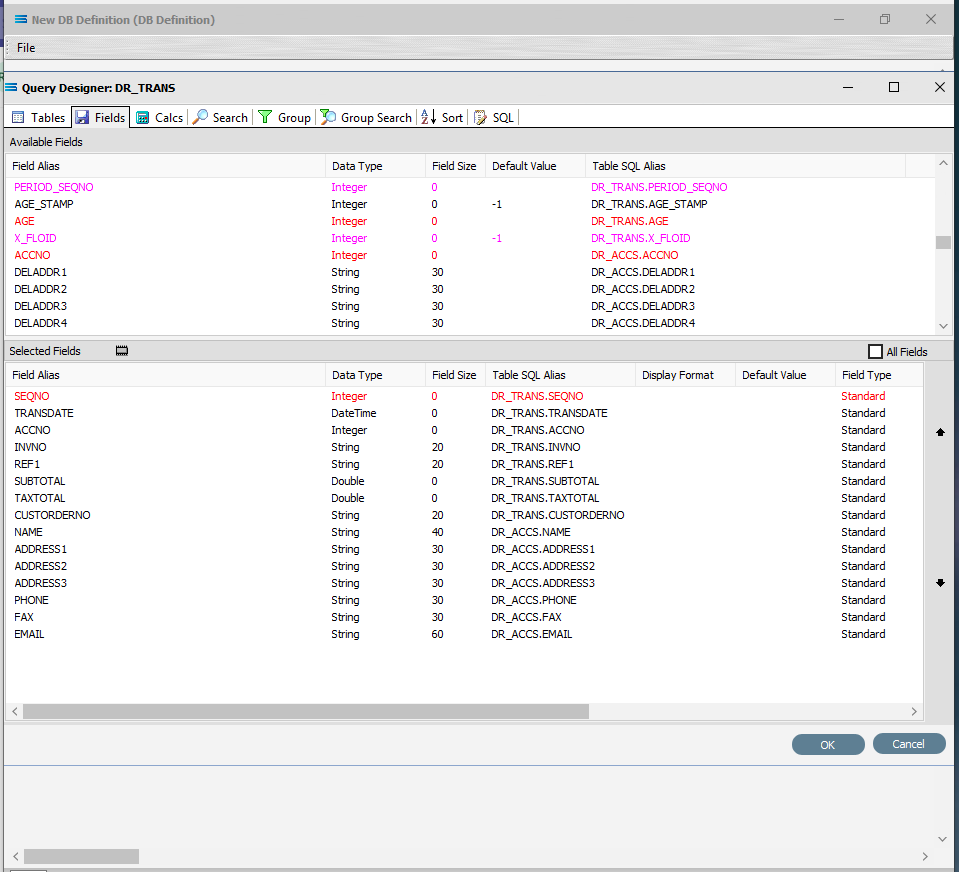
6. Save the two-table query by clicking **OK** on the bottom right of the window, and return to the definition canvas. The configured dataview will display, listing all of the fields that were selected - from both tables.
### Add Another Dataview Query
1. Add another **DB Dataview** - click on the **File** menu in the top left corner, and choose **New** (or use the Ctrl+N). The **New Items** window will open and only one item called **DB Dataview** will be displayed.
Click **OK** to add **DB Dataview**. The **Query Designer** window will open.
2. Scroll down the available tables to **DR_INVLINES** (Debtor Invoice Lines) and double-click to select it. The selected table will appear in the lower pane, but will also stay in the **Available Tables** pane.
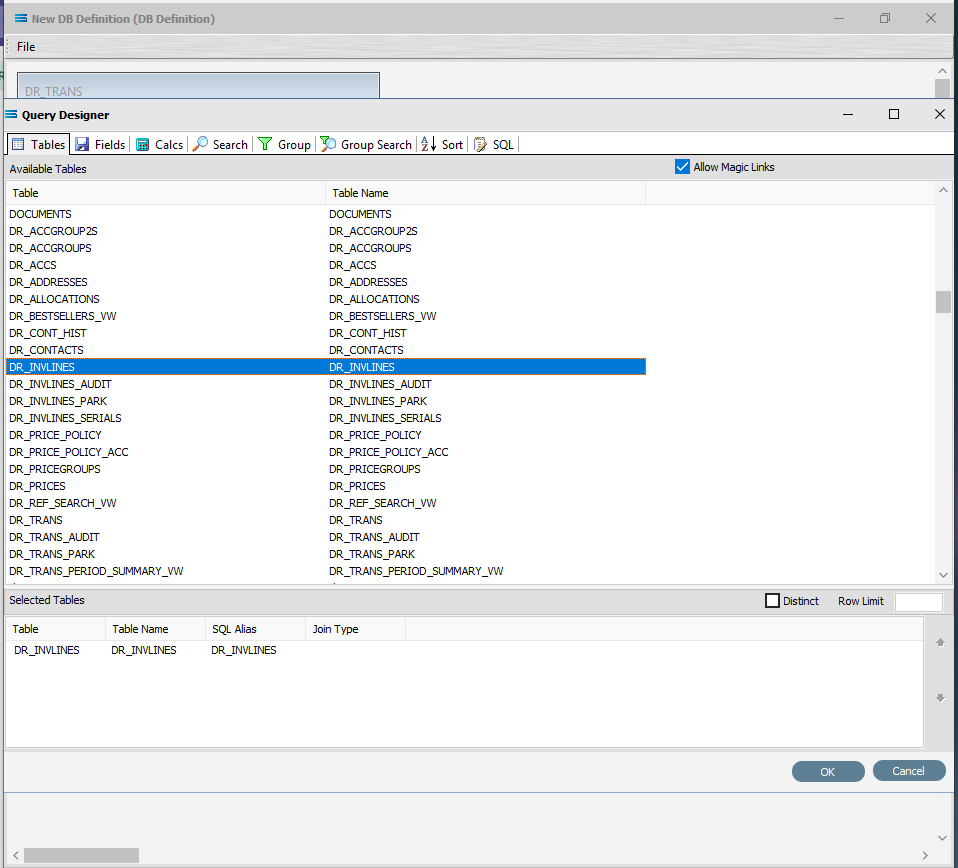
3. Move to the **Fields** tab, and add the following nine fields to the query by double-clicking on them:
1. **SEQNO** (sequence number)
2. **HDR_SEQNO** (invoice header sequence number)
3. **STOCKCODE**
4. **DESCRIPTION**
5. **QUANTITY**
6. **UNITPRICE**
7. **LINETOTAL_TAX**
8. **LINETOTAL**
9. **LINETOTAL_INCTAX**
4. **SEQNO**, **LINETOTAL**, and **LINETOTAL_INCTAX** will display as **RED**. As you select fields from the **Available Fields** pane, they will appear in the **Selected Fields** pane, and disappear from the **Available Fields** pane.
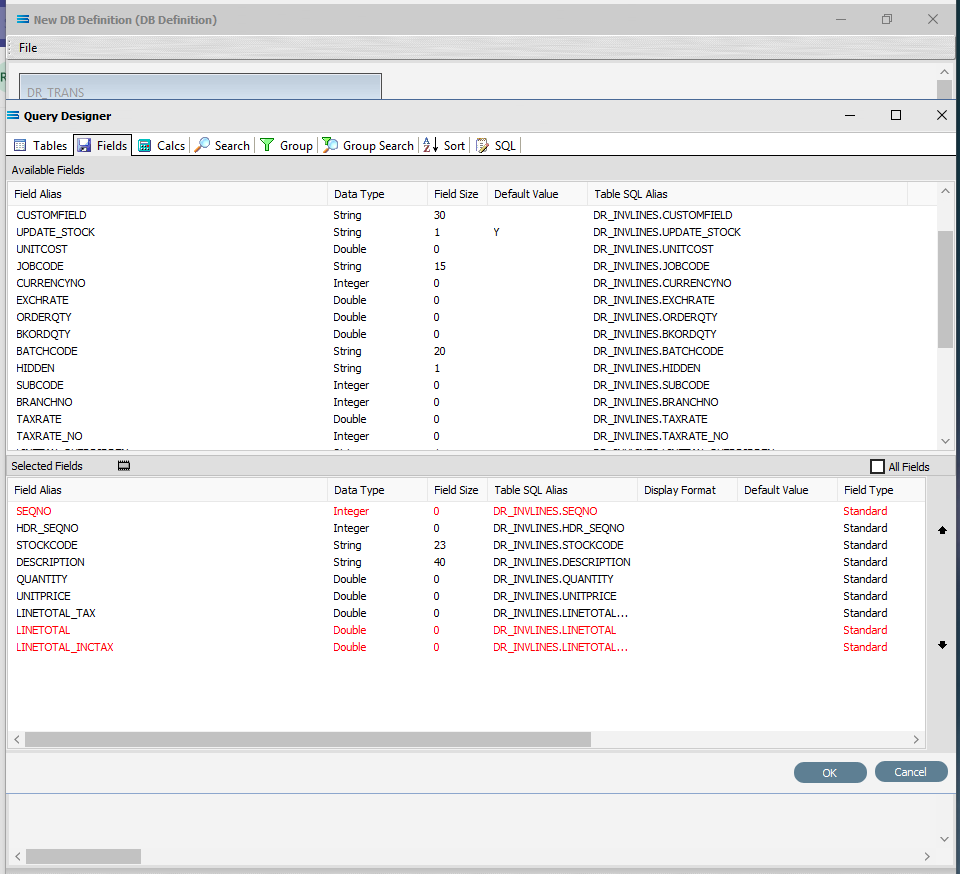
Click **OK** at the bottom-right of the **Query Designer** to save the dataview and return to the definition canvas. Both configured dataviews will display - one named **DR_TRANS** and one named **DR_INVLINES**.
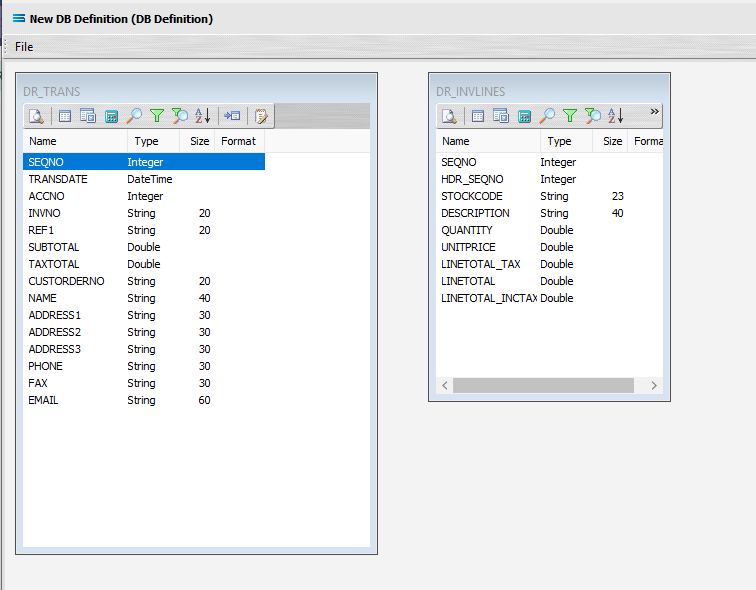
### Link The Datasets
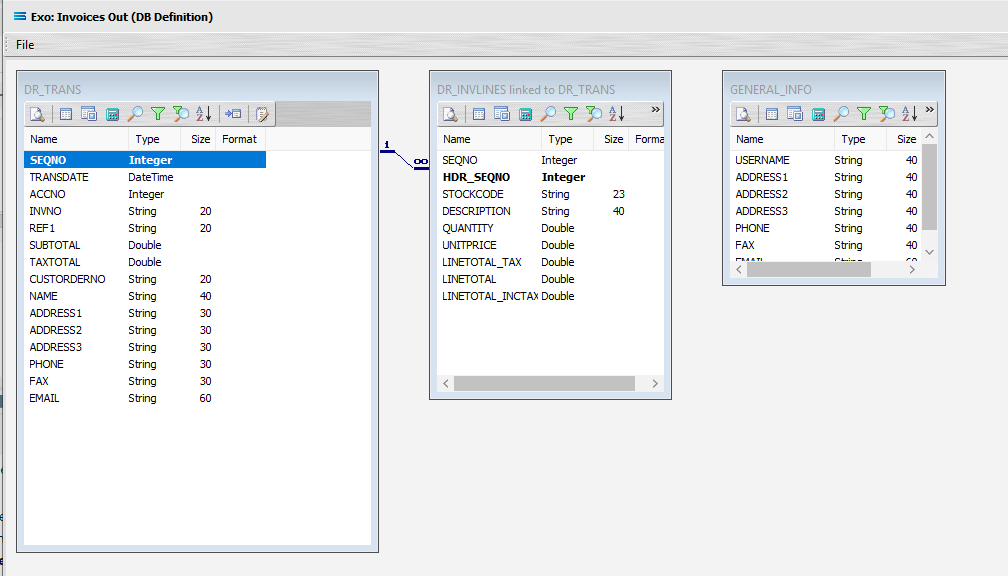
1. We want to link these together, so we will add a relationship between the two datasets by dragging the **HDR_SEQNO** field from the **DR_INVLINES** dataview and dropping it onto the **SEQNO** field of the dataview **DR_TRANS**. The drag-and-drop label will tell you when you are hovering over the correct field and can release the cursor.
2. Look out for “Link detail DR_INVLINES.HDR_SEQNO to master DR_TRANS. < >”. The field name within the diamond brackets is the field that will be linked to.
::: info
If you accidently drag‑and‑drop and link the wrong fields together, click on the diagonal link line so that it is highlighted in **CYAN**, and press **Delete**. Then simply re-link the fields across the datasets.
If you already have established a link between the datasets using this drag-and-drop action, any additional drag-and-drop link will replace the existing link.
To achieve any additional links, use the **LINK** toolbar icon in the child dataset, and create your multiple links this way.
:::
3. Three things will happen. **DR_INVLINES** will be renamed to **DR_INVLINES linked to DR_TRANS**. A one‑to‑many relationship link will appear between the two dataviews - the “single” link pointing at **SEQNO** in **DR_TRANS**, and the many pointing at **HDR_SEQNO** in the renamed dataview **DR_INVLINES linked to DR_TRANS**. These two linked fields will also be highlighted in bold text.
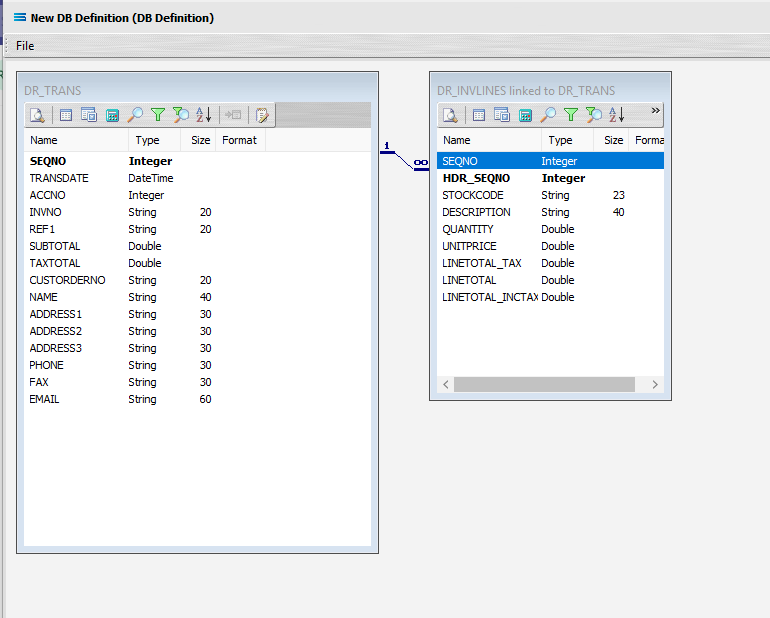
4. You have come so far, so for peace of mind, you can save your progress so far by selecting **File Close**, and then **Save** the **DB Definition**. To continue, simply click in the definition **Exo: Invoices Out** again to open it, and select **Design** to open the definition canvas. Your two datasets should display as above.
### Add Another Dataview Query
1. In this tutorial, a third dataview now needs to be added. Click **File** **New**, click **OK** to add a **DB Dataview**.
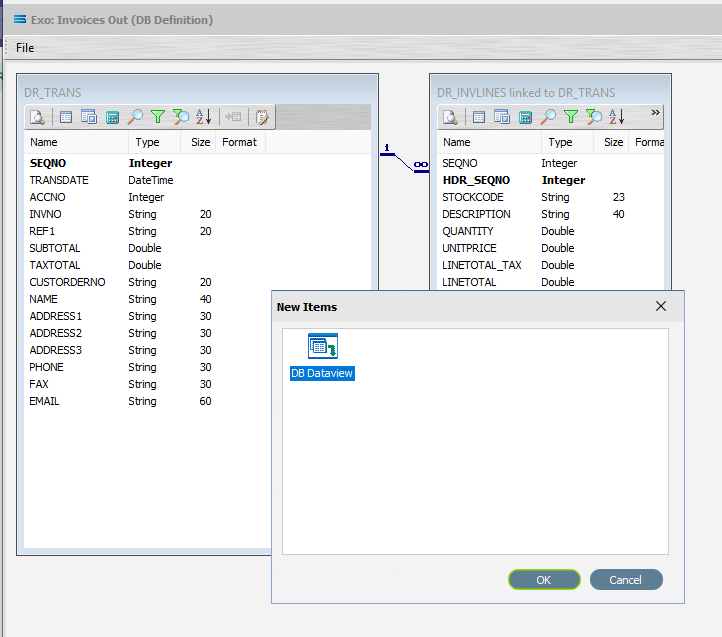
2. In the **Query Designer**, scroll down and select the **GENERAL_INFO** table by double-clicking on it in the **Available Tables** list. It will appear under **Selected Tables**.
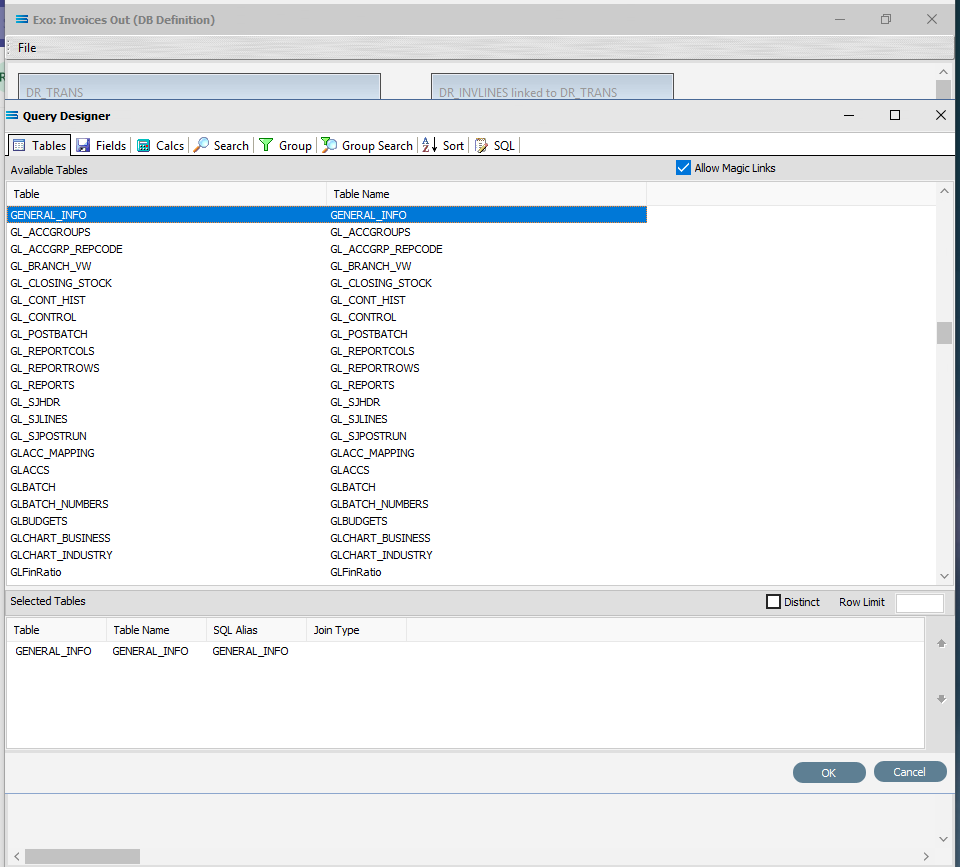
3. Move to the **Fields** tab. Add the following fields by double-clicking on each of them in turn:
1. **USERNAME** (company name)
2. **ADDRESS1**
3. **ADDRESS2**
4. **ADDRESS3**
5. **PHONE**
6. **FAX**
7. **EMAIL**
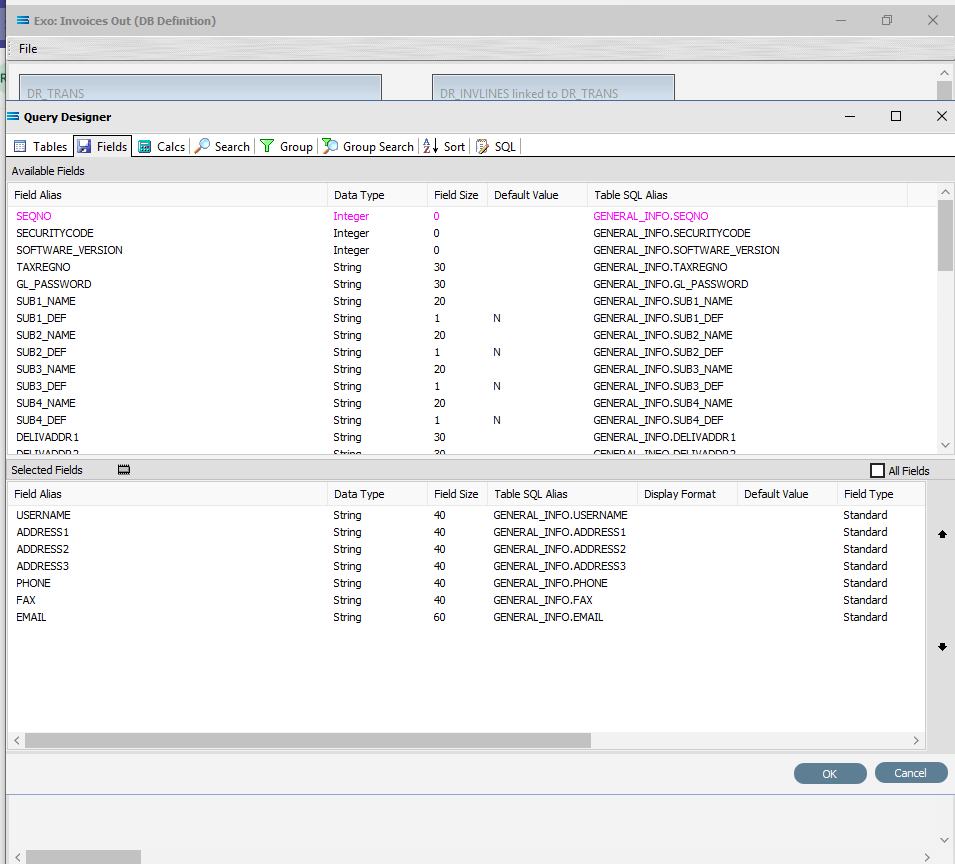
4. Click **OK** at the bottom-right of the **Query Designer** to save the dataview and return to the definition canvas. A third unlinked dataview called **GENERAL_INFO** will appear on the canvas.
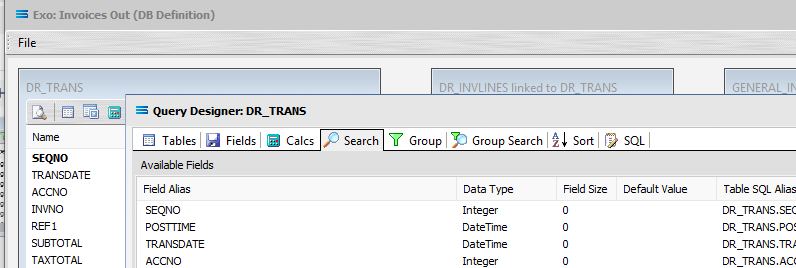
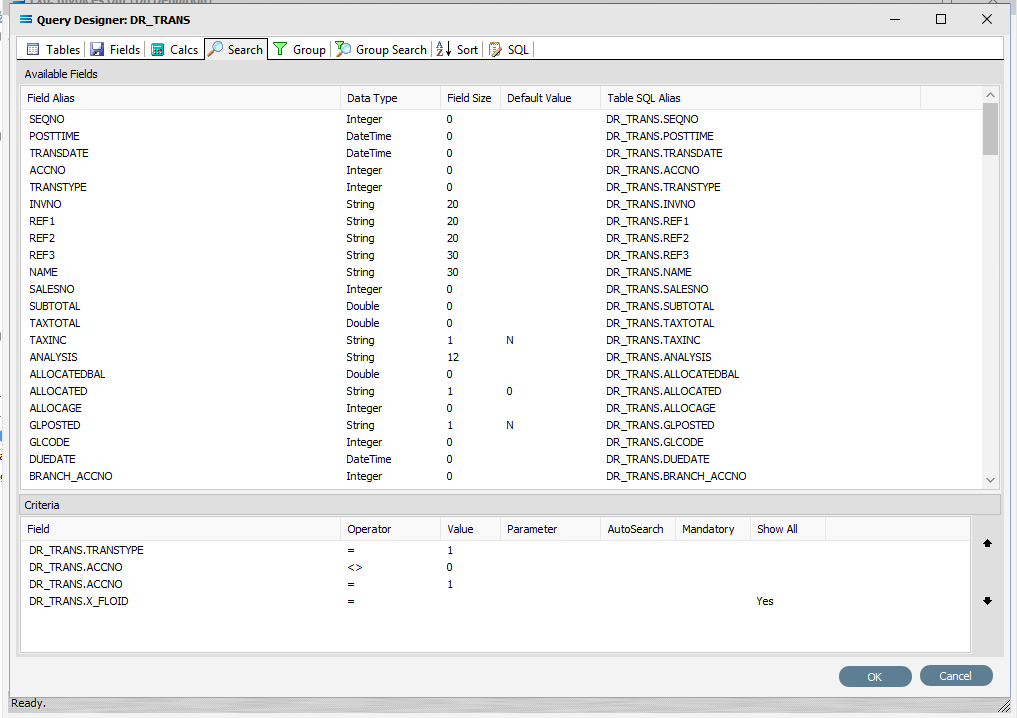
5. Now we want to add some criteria. You can click the **Search** tab on the **DR_TRANS** dataview to open the **Query Designer** window on the **Search** tab.
Or get to the same place by simply clicking on the **Tables** tab for the dataview.
And then when the **Query Designer** window opens, move to the **Search** tab. Expand the window as required.
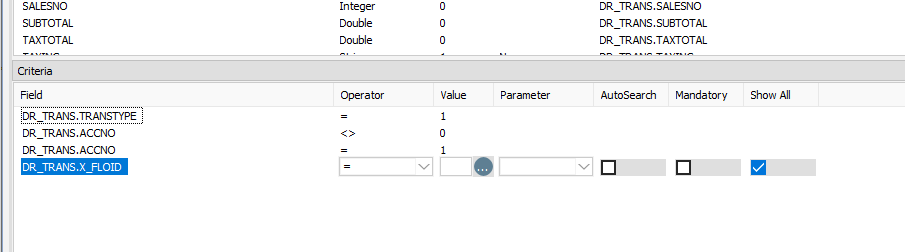
6. The upper pane shows the **Available Fields**, under the heading of **Field Alias**. This table holds the data for payments as well as invoices, so as we only want to select records pertinent to invoices, we add the criteria here. To the right of the field name in the lower **Criteria** pane, there are several extra fields, including **Operator** and **Value**. To select a field, double-click on it in the **Available Fields** list. You can click on an individual field more than once – it will not disappear from the available fields list once selected. The **Operator** can be selected from the drop-down list.
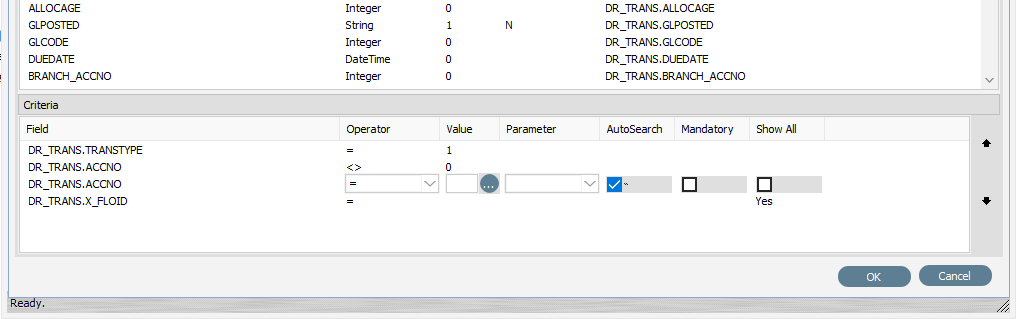
7. Use **Tab** to move from one column into another, or simply click out of the column to move across. The field name will appear in the lower **Criteria** pane, prefixed by the table name, and separated by a full-stop. Where a choice is offered such as with **Operator**, click on the drop-down sign to see available selections, and then select the appropriate one. Click on the following fields to move them to **Criteria**, and add the following selection criteria:
1. **TRANSTYPE = 1** (to only select invoices -“**1**” means an invoice. Operator is an equals sign = and Value is 1)
2. **ACCNO <> 0** (do not include cash account transactions)
3. **ACCNO = 1** (currently only select transactions for account #1)
4. **X\_FLOID = Show All** (tick Show All so that any criteria will be ignored at this stage)
8. Click **OK** at the bottom-right of the **Query Designer** to save the dataview and return to the definition canvas.
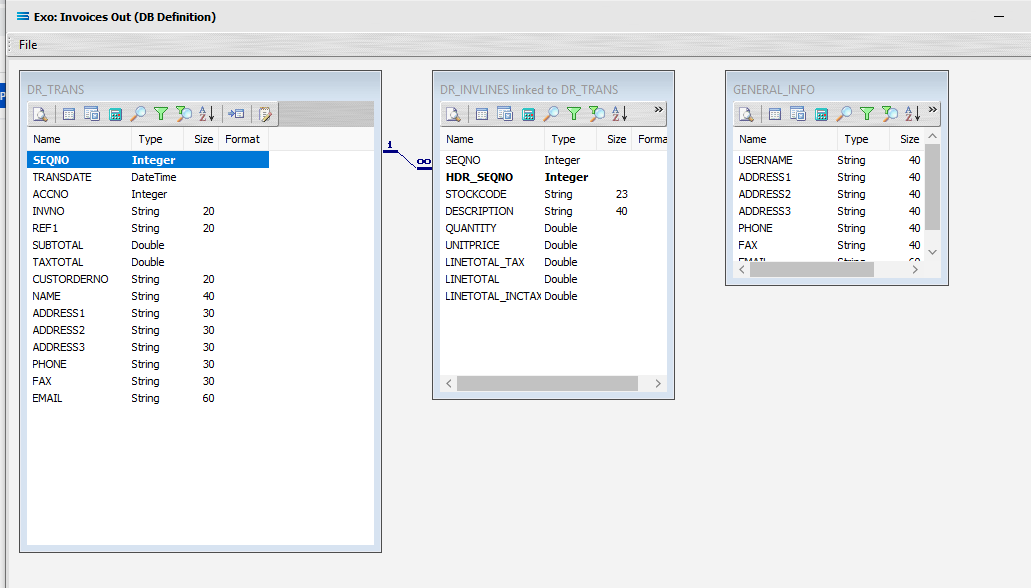
9. Close the definition canvas by selecting **Close** from the **File** menu. You will return to the **Exo: Invoices Out** definition window. Click **Save** to save and close the module.
The **DB Definition** named **Exo: Invoices Out** will now appear in the structure tree under **Configuration > Components > Data Definitions > DB Definitions**.
## What the data is - Creating file definitions
The **File Definitions** module is used to design the structure of the files that are read from, or written to, the **Statelake** configuration. This tutorial illustrates the use of a multi‑tier dataset for the destination.
**Designer** will already be open. If not, open the **Statelake** module **Designer** for the selected configuration. An expanded structure tree is displayed on the left side of the screen.
### Create File Definition
1. Follow the path **Configuration > Components > Data Definitions > FIle Definitions**. Right‑click on **File Definitions** and choose **New** from the drop-down list.
2. **New File Definition** appears in the structure tree. In the **New File Definition** window the following information is to be entered under the **General** tab.
1. **File Type** – select **XML File**.
2. **File Definition Name** – the default is **New File Definition**. Enter the definition name of the source file, as specified during the creation of the **File Connection**. In this tutorial it is **Training: Invoice**.
3. **DB Connection** – right-click anywhere in the **DB Connection** box, select **Add** then select **MYOB Exo**.
4. **File Connection** - select **Training: Invoice** from the pull-down list.
5. **Disable Automatic String trim** – leave with the default tick as set.
6. **XSD Schema** – either click the **3-dot ellipse** to navigate to the directory where the schema files were copied and select **Invoice.xsd** by clicking on **Open** or enter the path name as \\Training\Invoice.xsd.
::: info
When working with XML files, **Statelake** will always require schema files (XSD), not only to define the structure of the file, but also for validation purposes when reading from, or writing to, and XML file.
:::
g. Resolve Imported/included schemas (recommended) – leave as ticked.
h. All other fields and tick boxes are to be left as defaulted.
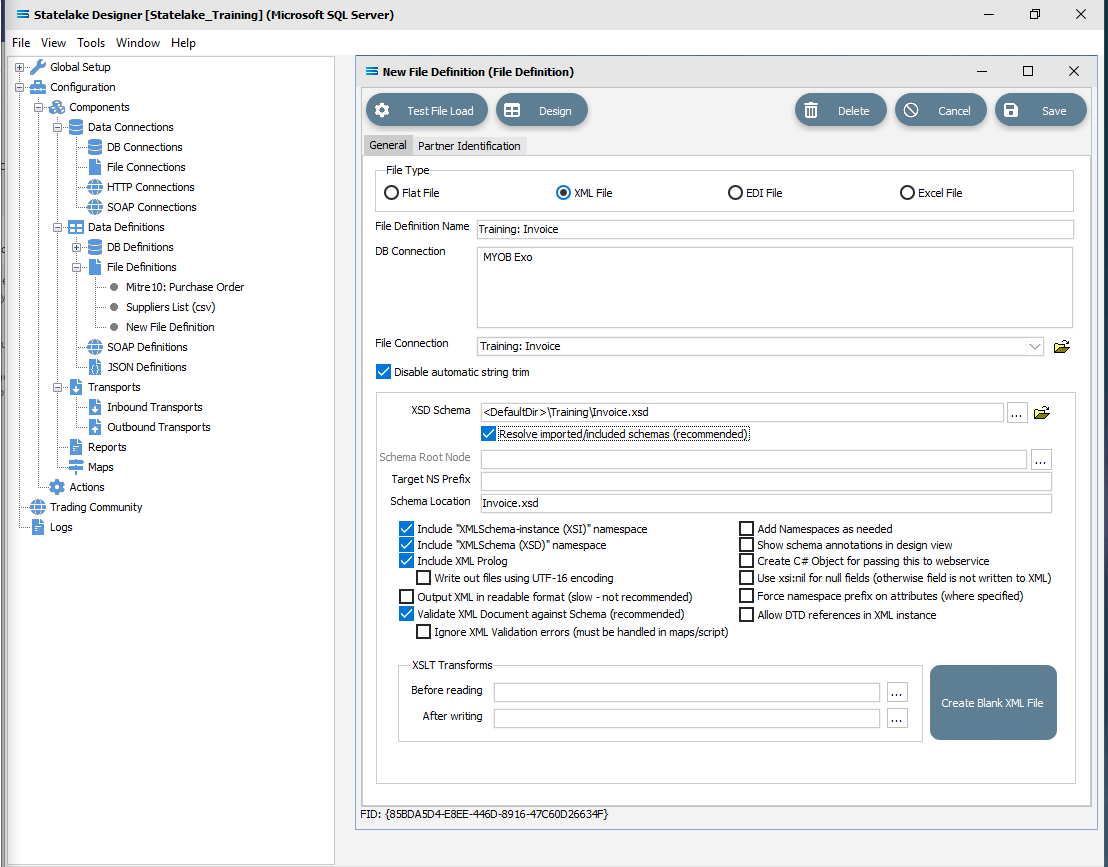
3. Click **Design** in the top left of the window.
### Create File Dataview Query
1. A blank definition designer canvas will display. To start creating your file, click on the **File** menu in the top left corner, and choose **New** (or use the Ctrl+N).
2. The **New Items** window will open and two options called **XML Dataview** and **DB Dataview** will be displayed.
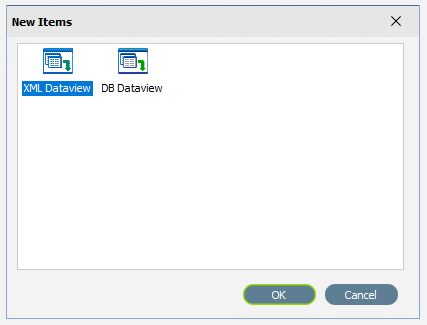
3. Select **XML Dataview** and click **OK** to add a new **XML Dataview**. The **XML File Designer** window will open. Expand this window if required, to ensure that the **Available Records** and **Selected Record** panes are both displayed fully.
::: info
The **Records** tab may automatically populate some records or elements. These are read from the schema file that you identified on the initial window.
:::
4. There are three tabs – **Records**, **Fields** and **Calcs**. In this tutorial, the **Records** tab will display **Invoice** in the **Available Records** pane schema tree. If there are multiple entries, scroll down until **Invoice** is highlighted and double-click on it to select. **Invoice** is the **Root Node**.
1. The **Name** and **Root Node** fields in the lower **Selected Record** pane will be automatically populated. **Name** will display as **INVOICE**. **Root Node** will display as \Invoice.
::: info
**Root Node** in this context is the parent element or file identifier for the group of fields and records that you are adding to this dataview. You will see that the path to the fields will be constructed based on the **Root Node** you specified.
:::
b. All other fields and tick boxes are to be left as the set default.
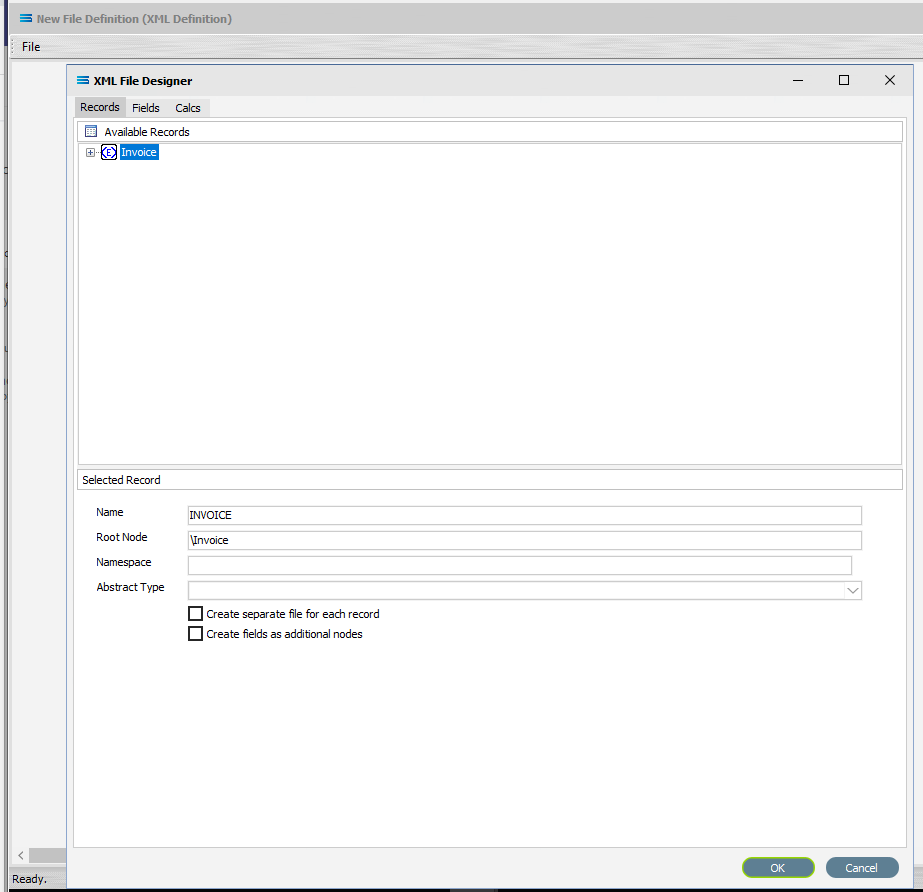
5. Click on the **Fields** tab. If it has not already been expanded, then click on the **plus** to expand **Invoice** in the **Available Fields** pane.
::: info
The structure in the schema file **Invoice.xsd** determines how these field relationships are handled within this XML **File Definition**.
There is a symbol to the immediate left of the field name. A BLUE \ signifies that the item is a non-repeating complex element (a record). A folder icon identifies a repeating complex element (record). A **YELLOW T** indicates a simple element (a field),
The top level in the file structure tree is referred to as the **Root Node** - the name given to the envelope that holds the group of source records. It is the start of the structure tree. In this tutorial, this is the name given to this group of invoices.
The elements Customer and Supplier are nodes that branch off the **Root Node**. These are datasets or groups of records in their own right with their own sets of fields.
The asterisk (\*) at the end of the field name means that you can have more than one of these fields in a single record. There is no limit.
A **RED A** at the end of the field name identifies the field as an attribute.
:::
6. Click on the \ symbol beside **Customer** and **Supplier** to expand these groups, to show the fields within this record grouping. Expand the window or drag the separator bar between the upper and lower panes down if required.
7) Now click on every field under **Invoice**, **Customer** and **Supplier** to add them to the **Selected Fields** pane. **Do not however**, click the elements themselves (those with a \ symbol prefix). And do not select the folder **InvoiceLine**, as this will be dealt with in the next step. We want all of the fields, but not their “**wrappers**”. You will see that every field once selected will be prefixed with the element name and an underscore as a location tag. For instance, the first field selected will be **Invoiceno** within the Invoice “**wrapper**”. It will appear in the **Selected Fields** pane as **Invoice_Invoiceno**.
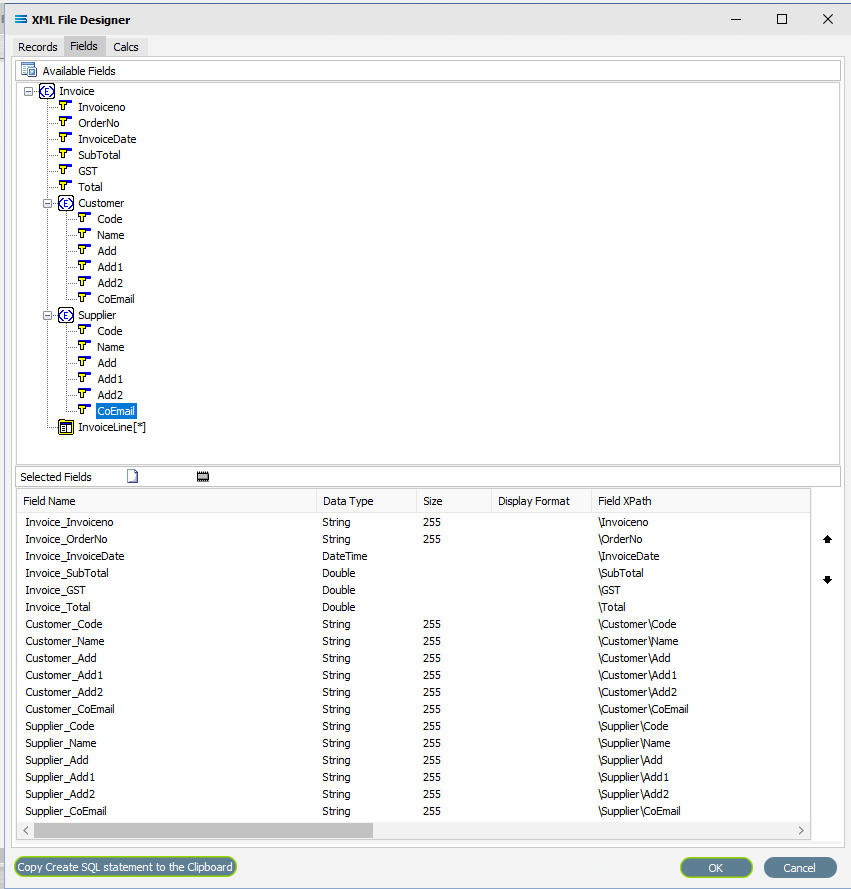
8. Click on the the **OK** button to save and close the window. You will return to the **New File Definition** canvas and a definition window named **INVOICE** will display. Expand this window as desired.
### Create 2nd Dataview Query
1. Create another **XML Dataview** for the node **InvoiceLine** by clicking on the **File** menu in the top left corner, and choose **New** (or use the Ctrl+N). Select **XML Dataview** and click **OK** to add a new **XML Dataview**.
2. The **XML File Designer** window will open on the **Records** tab and will display the expanded selection of **Invoice**, **Customer** and **Supplier** as previously displayed. Double-click on **InvoiceLine** to select it as the **Root Node**.
1. The **Name** and **Root Node** fields in the lower **Selected Record** pane will be automatically populated. The **Name** will now say **INVOICELINE**. The **Root Node** will now say \Invoice\InvoiceLine.
2. All other fields and tick boxes are to be left as the set default.
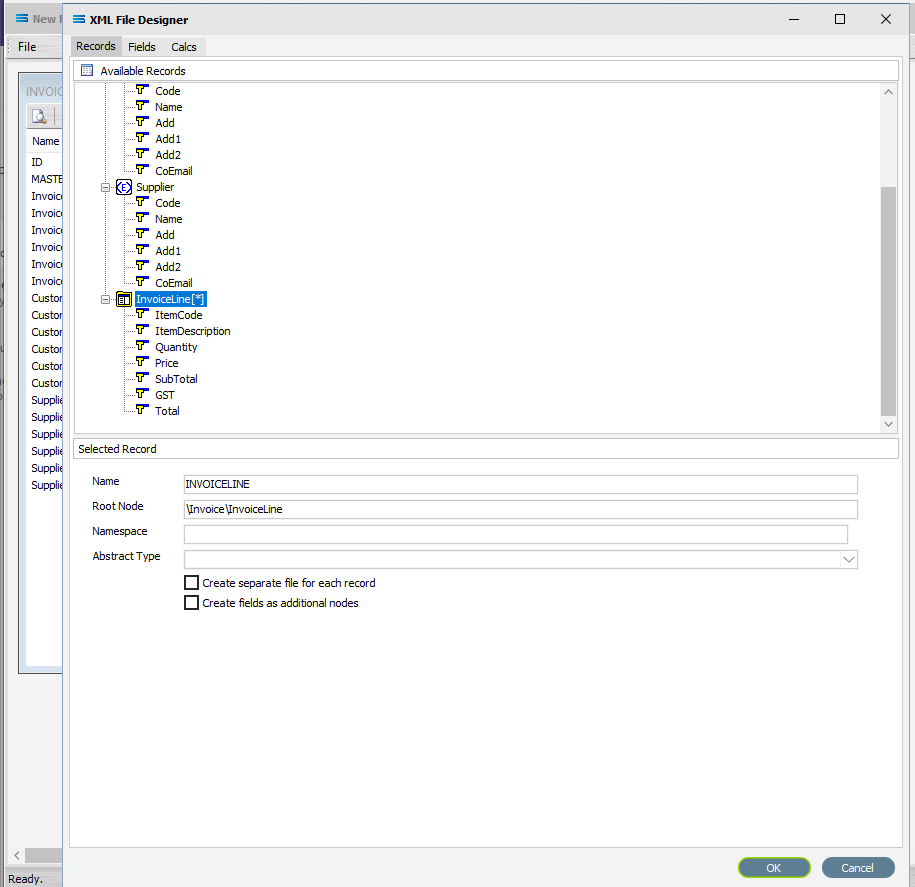
3. Move to the **Fields** tab and click on the plus to expand **InvoiceLines** if it is not already expanded. Add all of the fields by double‑clicking on them. Do not select **InvoiceLines** itself.
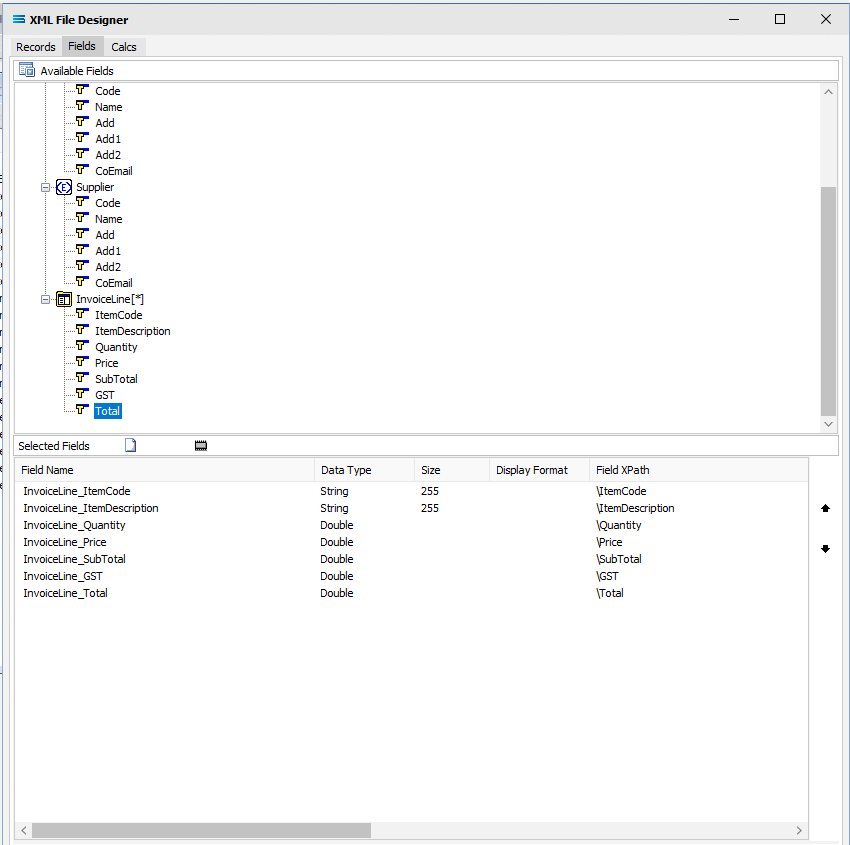
4. Click the **OK** button to save and close the window. The **New File Definition** canvas will display the two definitions **INVOICE** and **INVOICELINE**, being the names given to each **Root Node**.
### Link The Datasets
1. To link the two together, we add a relationship between the two datasets by dragging the **MASTER_ID** field from the **INVOICELINE** dataview and dropping it onto the **ID** field of the dataview **INVOICE**.
You will notice the same linking behaviour as previously experienced. Three things will happen. **INVOICELINE** will be renamed to **INVOICELINE linked to INVOICE**. A one‑to‑many relationship link will appear between the two dataviews - the “single” link pointing at **ID** in **INVOICE**, and the many pointing at **MASTER_ID** in the renamed dataview **INVOICELINE linked to INVOICE**. These two linked fields will also be highlighted in bold text.
2. Click on the **Records** tab of the **INVOICE** dataview.
Then click in the tick box **Create separate file for each record**.
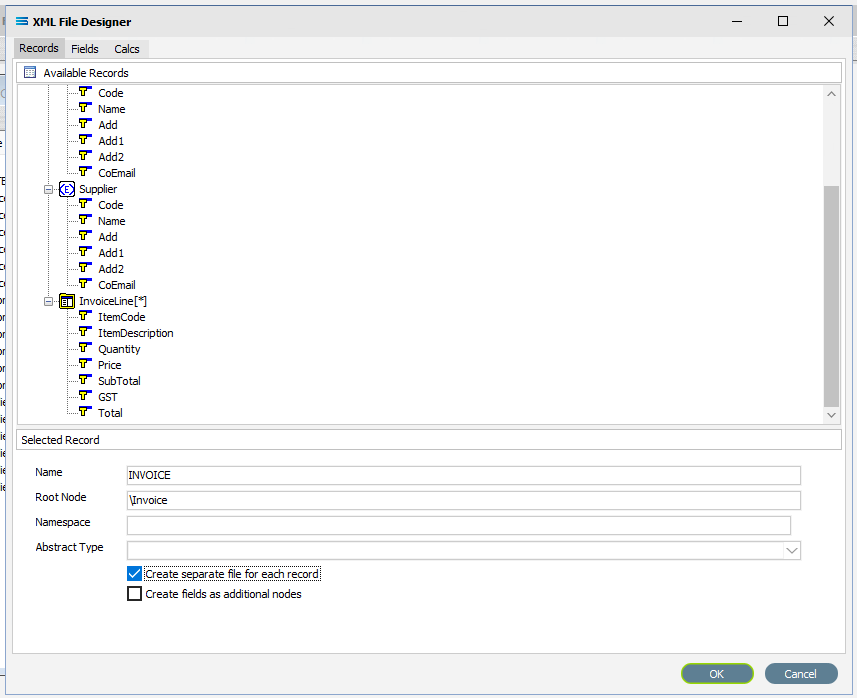
Click the **OK** button to save and close the window.
3. Close the definition canvas by selecting **Close** from the **File** menu. You will return to the **New File Definition** window. Click **Save** to save and close the **New File Definition** module and the definition **Training: Invoice**.
The **File Definition** named **Training: Invoice** will now appear in the structure tree under **Configuration > Components > Data Definitions > File Definitions**. You have now successfully created another file definition for an XML file type with a multi‑tier dataset.
## What To Do With The Data - Creating Maps
You have skillfully created two **XML definitions** for this tutorial. Now the **Map** is to be created.
**Designer** will already be open. If not, open the **Statelake** module **Designer** for the selected **Statelake_Training** configuration. An expanded structure tree is displayed on the left side of the screen.
### Create The Map
1. Follow the path **Configuration > Components > Maps**. Right‑click on **Maps** and choose **New** from the drop-down list.
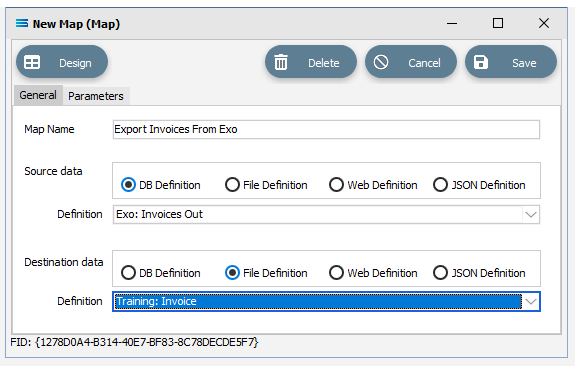
2. A **New Map** item is added to the tree. The **New Map** window contains two tabs - **General** and **Parameters**. The **Parameters** tab allows you to set other options, but for training purposes, we will be dealing with just the **General** tab. The following information is to be entered for the main map.
1. **Map Name** – for this tutorial the name will be **Export Invoices From Exo**.
2. **Source Data** – highlight the **DB Definition** radio button.
3. **Definition** – select the **DB Definition** that was created for this configuration called **Exo: Invoices Out** from the pull-down list.
4. **Destination Data** – highlight the **File Definition** radio button.
5. **Definition** – select the **File Definition** that was created for this configuration called **Training: Invoice** from the pull-down list.
### Open The Map
1. Click the **Design** button to open the map designer window **New Map**. You will now be familiar with the layout of the **New Map** window.
2. You will see under **Source**, the tables **DR_TRANS** and **GENERAL_INFO**. And under **Destination**, the table **INVOICE**. Click the plus beside **DR_TRANS** in the **Source** pane to expand, and click on the plus beside **INVOICE** in the **Destination Data** pane.
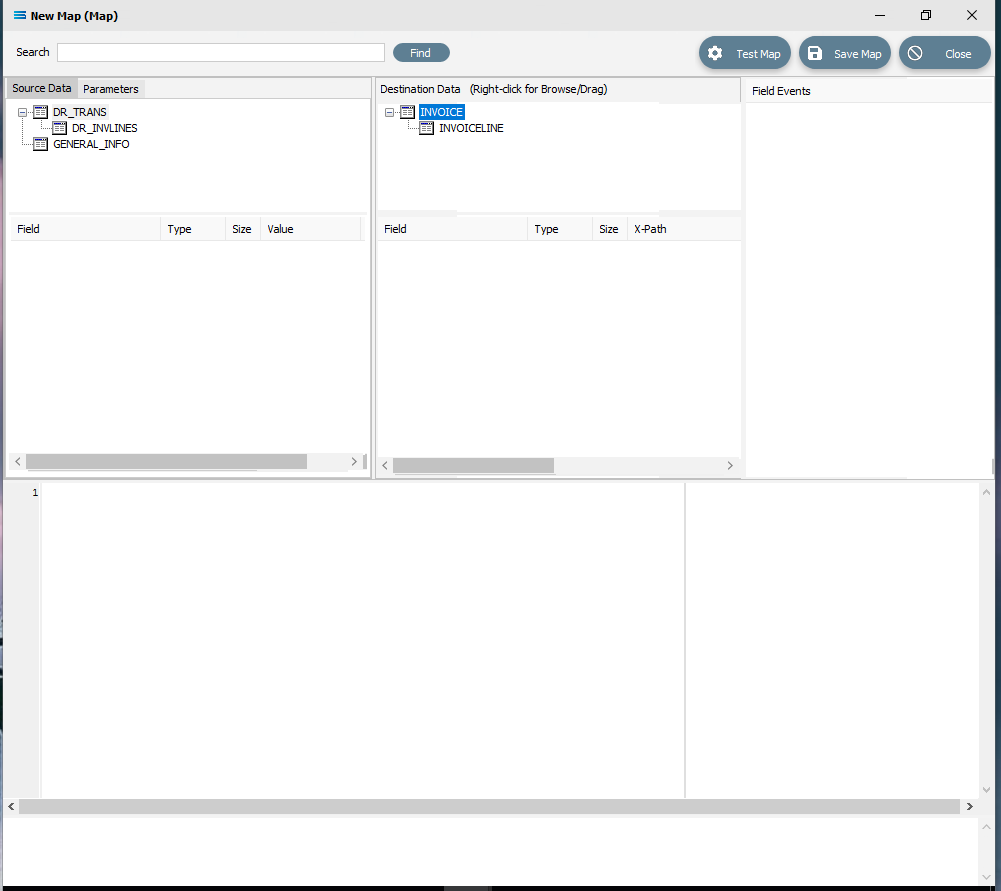
3. In this tutorial we will link the source dataset table **DR_TRANS** to the destination **INVOICE** dataset by dragging and dropping **DR_TRANS** onto **INVOICE**. A successful drag-and-drop will produce a **LinkedDataEvent** code in the **Scripting Area**.
*Close up of the code.*
```pascal
procedure LinkedDataEvent(var LinkedData:TdaQueryDataView); // INVOICE
begin
LinkedData := DR_TRANS;
end;
```
4. And we will link the table **DR_INVLINES** in **Source Data**, to **INVOICELINE** in the **Destination Data** area by dragging and dropping **DR_INVLINES** onto **INVOICELINES**. A successful drag-and-drop will produce the following **LinkedDataEvent** code in the **Scripting Area**.
*Close up of the script.*
```pascal
procedure LinkedDataEvent(var LinkedData:TdaQueryDataView); // INVOICELINE
begin
LinkedData := DR_INVLINES;
end;
```
5. Click on **DR_TRANS** in **Source Data** and **INVOICE** in **Destination Data** to make those your current selected tables.
### Link The Fields
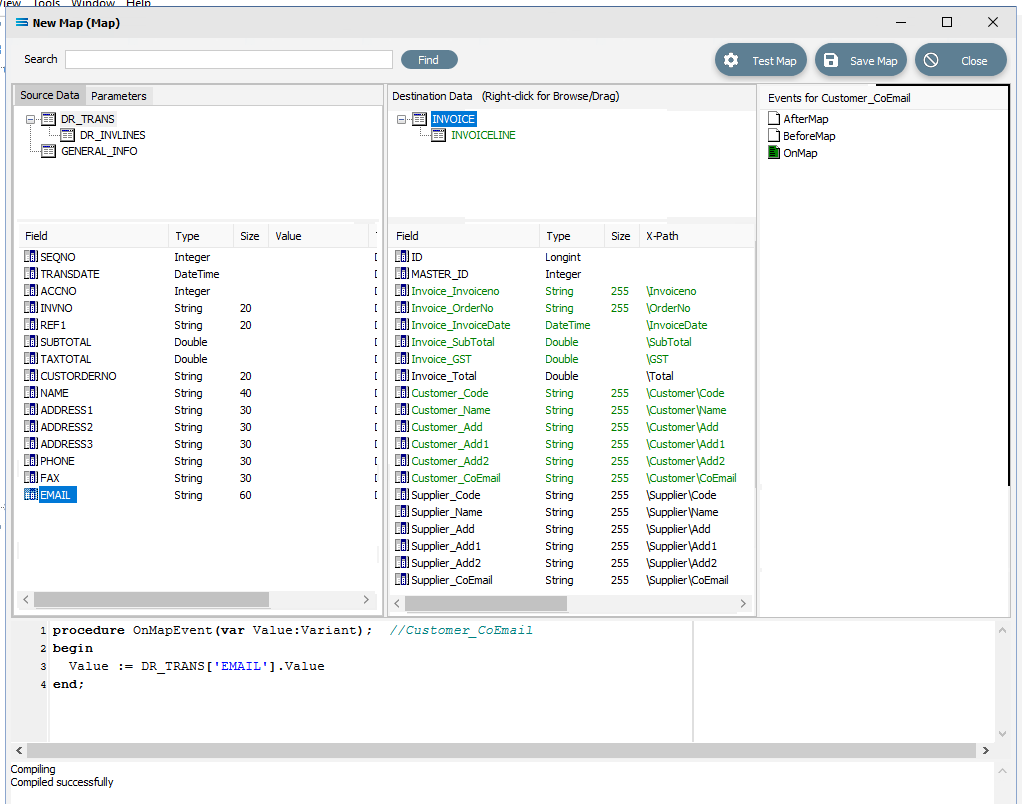
1. Now link the fields that are listed below using the same drag-and-drop technique. Drag the fields from the **Source Data** onto the **Destination Data** field. Each successful action will automatically generate **OnMapEvent** code in the **Scripting Area**, such as this following example for **DR_TRANS.INVNO** to **Invoice_Invoiceno**. The field in the **Destination Data** pane will change to **GREEN**.
```pascal
procedure OnMapEvent(var Value:variant); // Invoice_Invoiceno
begin
LinkedData:= DR_TRANS['INVNO'].Value
end;
```
1. **DR_TRANS.INVNO** to **Invoice_Invoiceno**
2. **DR_TRANS.CUSTORDERNO** to **Invoice_OrderNo**
3. **DR_TRANS.TRANSDATE** to **Invoice_InvoiceDate**
4. **DR_TRANS.SUBTOTAL** to **Invoice_SubTotal**
5. **DR_TRANS.TAXTOTAL** to **Invoice_GST**
6. **DR_TRANS.ACCNO** to **Customer_Code**
7. **DR_TRANS.NAME** to **Customer_Name**
8. **DR_TRANS.ADDRESS1** to **Customer_Add**
9. **DR_TRANS.ADDRESS2** to **Customer_Add1**
10. **DR_TRANS.ADDRESS3** to **Customer_Add2**
11. **DR_TRANS.EMAIL** to **Customer_CoEmail**
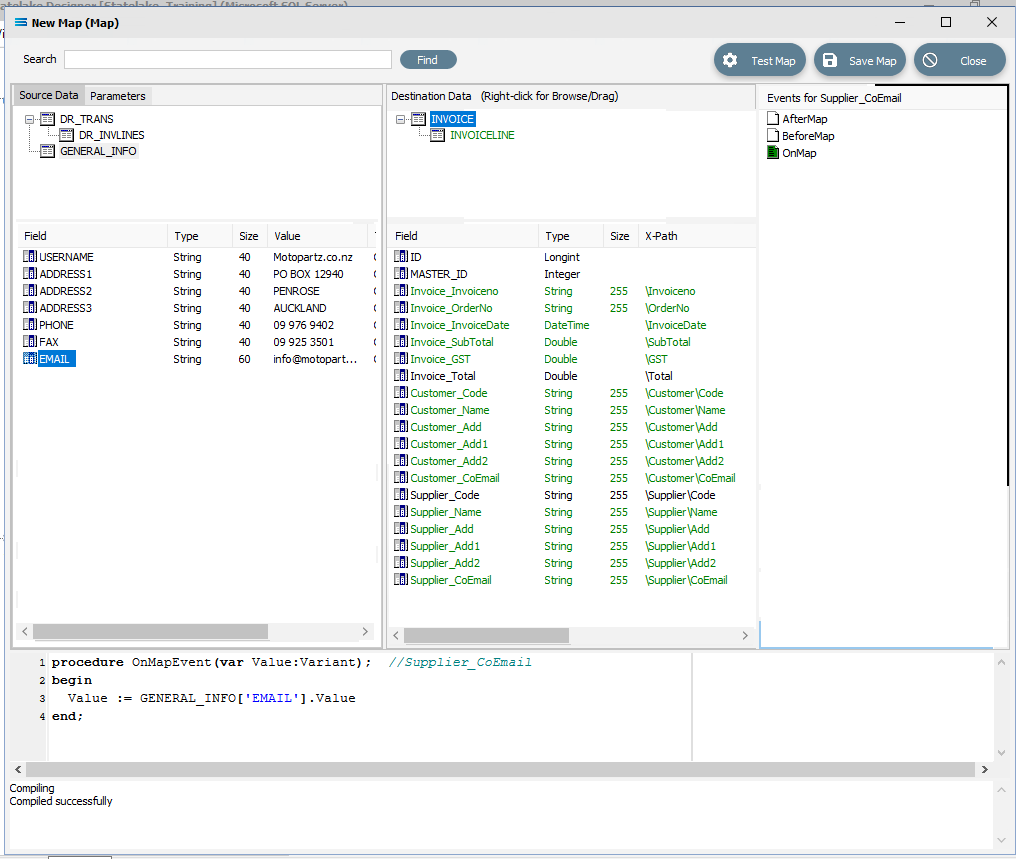
2. Click on the **GENERAL_INFO** dataset in the **Source** pane to make the current selection, and drag-and-drop the fields onto the **INVOICE** dataset in the **Destination** pane as below.
1. **GENERAL_INFO.USERNAME** to **Supplier_Name**
2. **GENERAL_INFO.ADDRESS1** to **Supplier_Add**
3. **GENERAL_INFO.ADDRESS2** to **Supplier_Add1**
4. **GENERAL.INFO.ADDRESS3** to **Supplier_Add2**
5. **GENERAL_INFO.EMAIL** to **Supplier_CoEmail**
3. Click on the **Supplier_Code** field in **INVOICE** to highlight it. This field is near the bottom of the list and has not been linked.
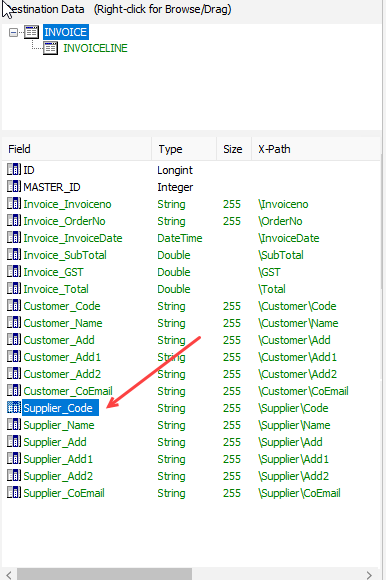
4. Click anywhere in the **Scripting Area** panel and **Statelake** will generate code for that field, as below.
```pascal
procedure OnMapEvent(var Value:Variant); //Supplier_Code
begin
Value :=
end;
```
5. Append to the third line and type ‘MOTO’ (single quote MOTO single quote) immediately after the Value :=, to set this to a static value.
```pascal
procedure OnMapEvent(var Value:Variant); //Supplier_Code
begin
Value := 'MOTO'
end;
```
6. Click back on the **Supplier_Code** field and you will be prompted to save your changes, so click **Yes**.
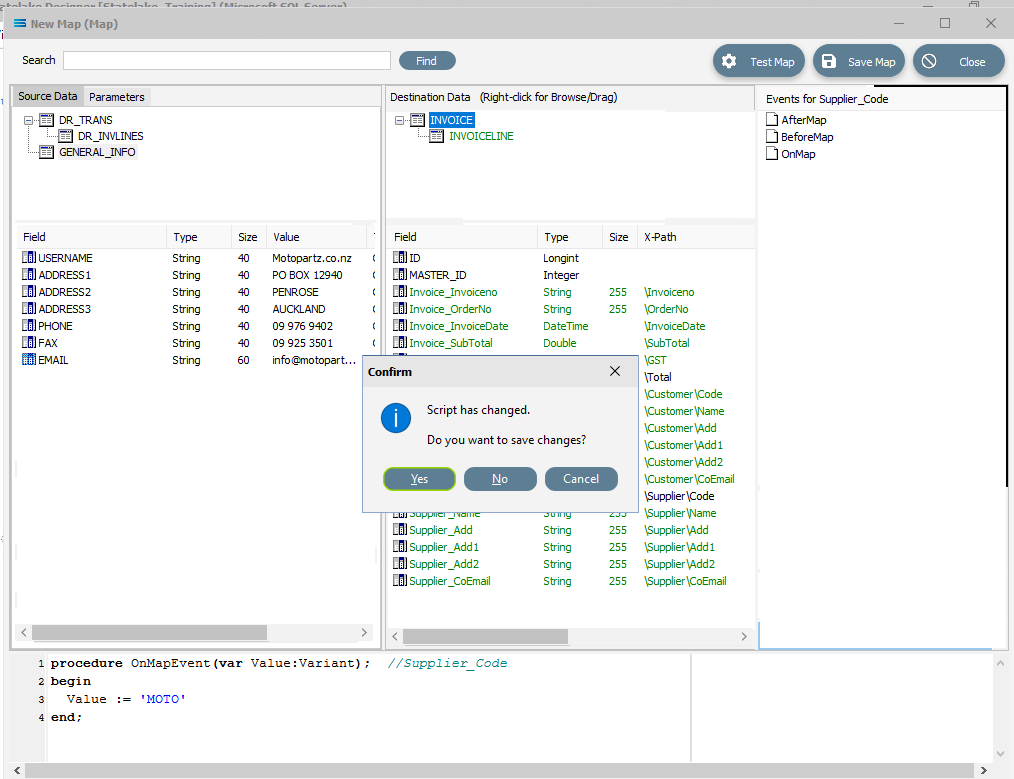
7. After entering the code as below, you can right-click anywhere in the **Scripting Area** and select **Test Compile** to verify that there are no errors and that the code has compiled successfully. The field colour will change to **GREEN** if the code has no error, but **RED** if there is an error with the script. Correct any script code errors and re‑test until the code is accepted.
8. Click on the field **INVOICE.Invoice_Total** to highlight it. This field has also not been linked as yet, and only a 1 will be displayed in the **Scripting Area**.
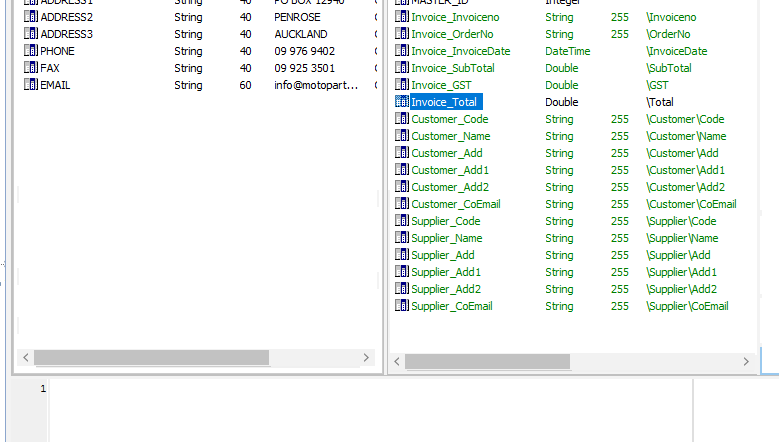
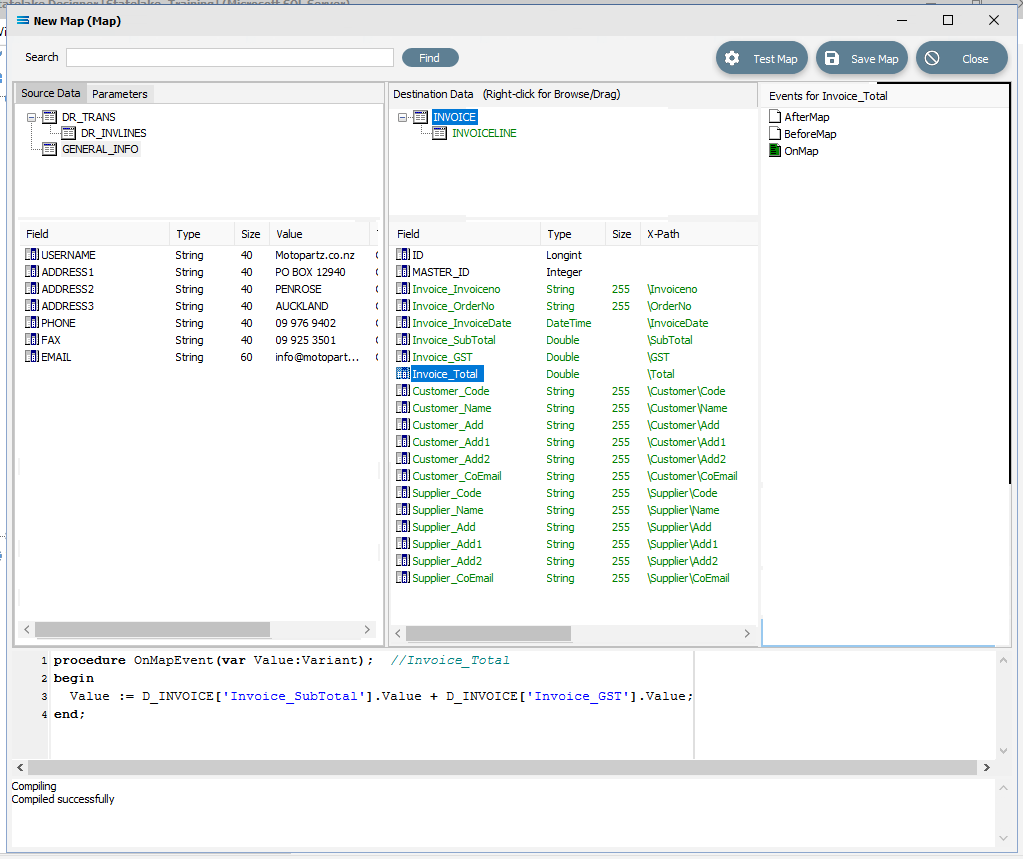
9. Click anywhere in the **Scripting Area** panel to automatically generate the **OnMapEvent** code. Append the third line to read: Value := D_INVOICE\[‘Invoice_SubTotal’].Value + D_INVOICE\[‘Invoice_GST’].Value;
10. The D\_ simply stands for destination, so it refers to the **INVOICE** dataset in **Destination Data**. Click back on the **Invoice_Total** field and you will be prompted to save your changes, so click **Yes**. If there is an error with the code, then the compile test will fail - correct the code and try again until your compile is successful.
11. Click on **DR_INVLINES** in **Source Data**, and on **INVOICELINE** in **Destination Data** to make these datasets the current selection.
12. Now map the following fields using the same drag-and-drop procedure:
1. **DR_INVLINES.STOCKCODE** to **InvoiceLine_ItemCode**
2. **DR_INVLINES.DESCRIPTION** to **InvoiceLine_ItemDescription**
3. **DR_INVLINES.QUANTITY** to **InvoiceLine_Quantity**
4. **DR_INVLINES.UNITPRICE** to **InvoiceLine_Price**
5. **DR_INVLINES.LINETOTAL** to **InvoiceLine_SubTotal**
6. **DR_INVLINES.LINETOTAL_TAX** to **InvoiceLine_GST**
7. **DR_INVLINES.LINETOTAL_INCTAX** to **InvoiceLine_Total**
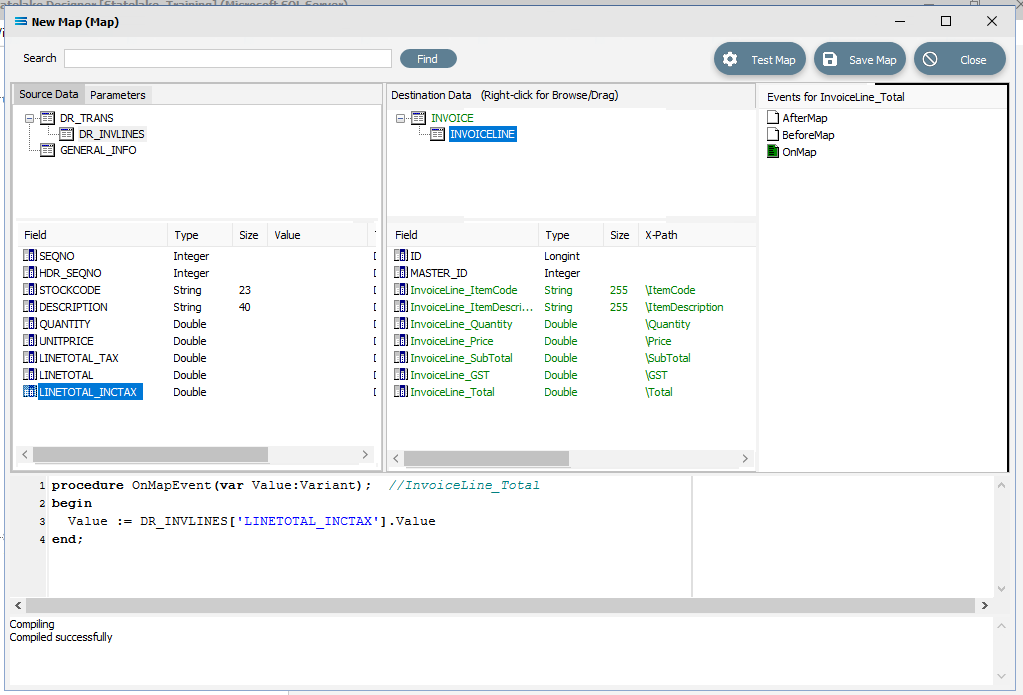
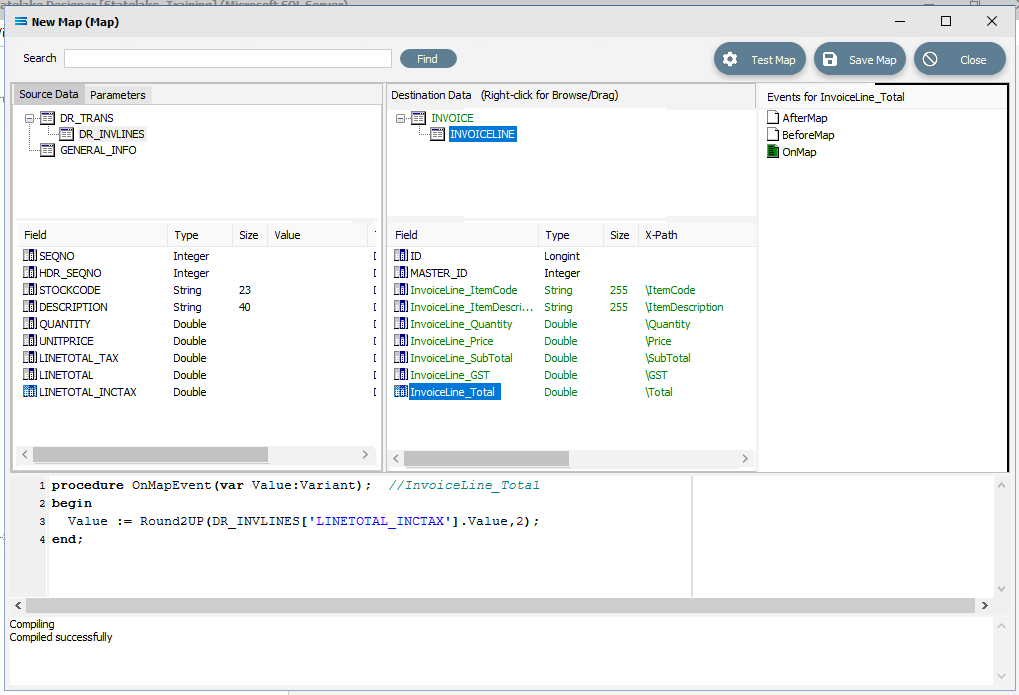
13. Click on **InvoiceLine_Total**. Click into the **Scripting Area** and alter the script by adding a function to round the value to the nearest cent. Line 3 of the script becomes: Value := Round2UP(DR_INVLINES\[‘LINETOTAL_INCTAX’].Value,2);
14. Click on **InvoiceLine_Total** to save the script.
15. Save the **Map** and commit all of the mapping and scripting by clicking **Save Map** in the top right corner. Select **OK** to close the successful save message, then click on the **Close** button to close the map designer window.
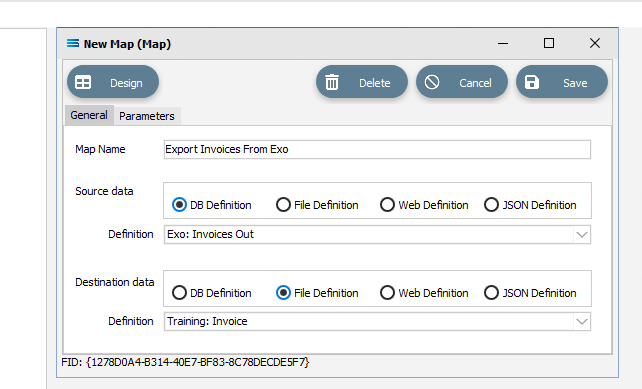
16. To commit all the mapping and scripting, click **Save** to save and close the mapping module.
The **Map** named **Export Invoices From Exo** will now appear in the structure tree under **Configuration > Components > Maps**.
### Test The Map
1. Now test the **Map** to ensure it is working:
2. Open the **Maps** module again by clicking on **Export Invoices From Exo**, and click on the **Design** button.
1. The **Export Invoices From Exo** map designer screen will display, with the **Source** data **DR_TRANS** and **GENERAL_INFO** showing, and **INVOICE** showing under **Destination Data**. **INVOICE** will be displayed in **GREEN**.
2. Click on **Test Map** in the top right corner of the screen, to execute the map in memory and generate a processing log which is then presented in a preview pane. If there is no data selected, then the log will have a pale **YELLOW** background.
If this occurs check your definitions or your script code, change whatever is incorrect, and try the test again. Outright errors will have a dark **PINK** background.
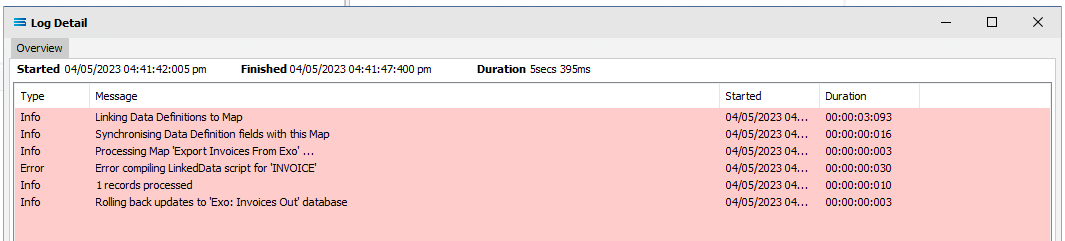
But with a successful test, the background will be pale **GREEN**.
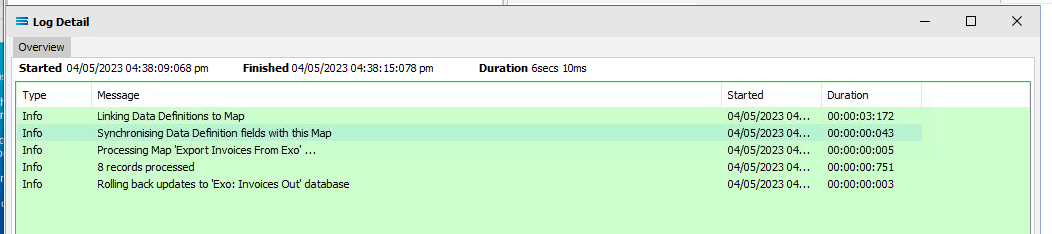
3. Close the pop-up preview of the log by clicking on the **X**, and the XML definition query **Training: Invoice** will be displayed on the canvas, including showing the link between **INVOICE** and **INVOICELINE**. Click on the **Preview** button on either dataset to view the list of all the processed records.
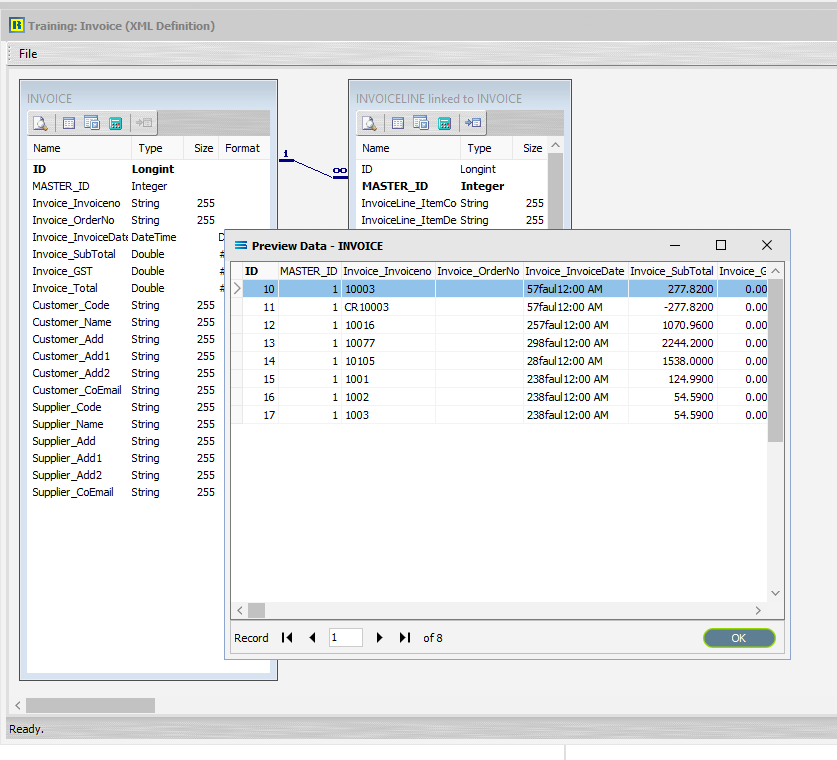
Click the **X** to close the **Preview Pane**.
::: info
You can only have the preview of one dataset open at any time.
:::
3. Select **File Close** on the canvas, the **Close** button on the map designer screen, and the **Cancel** button on the **Export Invoices From Exo** map entry window.
The **Map** has now been successfully configured, although no actual database activity has been generated.
## What Action To Take - Creating An Action
The next step is to create an **Action**. In this tutorial we will automatically create the **Action** from the **Map**.
**Designer** will already be open. If not, open the **Statelake** module **Designer** for the selected configuration. An expanded structure tree is displayed on the left side of the screen.
### Create The Action Automatically
1. Follow the path **Configuration > Components > Maps**. Right‑click on the map you have just created **Export Invoices From Exo**, and choose **Create Action** from the drop‑down list. An **Action** of the same name will be created and opened, and all the relevant components will be automatically added to this **Action**.
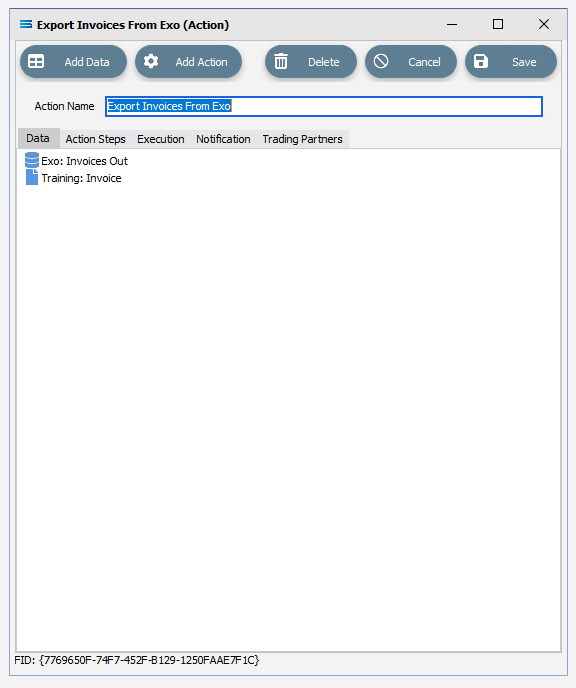
There is no need to do anything with this window, except select **Save** on the top right corner to close the module.
The **Action** named **Export Invoices From Exo** will now appear in the structure tree under **Configuration > Actions**.
### Amend The Action
1. In a live production situation, cancelled logs would not normally be retained. However, for the purposes of this tutorial we will change the notification default, so that all logs will be recorded and kept. Open the **Action** named **Export Invoices From Exo**, and move to the **Notification** tab.
2. In the section marked **Save Log** **on the following execution statuses**, make sure that all boxes are ticked – **OK**, **Warning**, **Error**, and **Cancelled**.
3. Select **Save** on the top right corner to save and close the module.
### Run The Action
1. To run the **Action**, right-click on the **Action** named **Export Invoices From Exo**, then select **Run Action**.
2. A window will pop-up showing the processing steps in a preview log, that will show the steps that were completed, how many records were extracted and processed, and where the destination file was saved. When the **Action** has been completed a status message will pop-up on screen indicating that processing is complete, and advising whether the process was successful or an error was encountered.
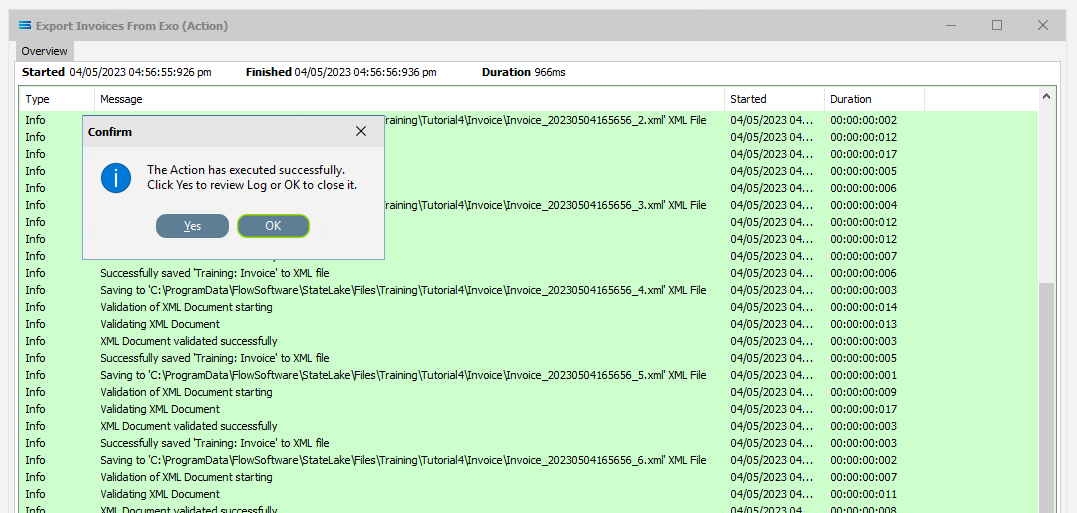
3. A successful **Action** will offer two choices – click **Yes** to review the log, or click **OK** to close the log without review. To close the log after review, click the **X** in the upper right corner.
::: info
**Logs** can be re-opened at any stage, and as many times as required. A review a **Log** from the **Manage Logs** module, double-click on the **Log** required. To drill into any line on a **Log**, double-click on the line to see more detail.
:::
The process is now complete, all modules have been closed, and the structure tree will be the only item on the **Designer** screen.
The configuration for the basic process of extracting invoices into XML is complete. Well done !
## Autosearch
**Autosearch** is an available option within the **DB Definition** that allows entry of the search criteria while running an **Action**. Rather than being entered as static values within the **DB Definition** as we have done, using this functionality not only allows for more flexibility, but also has the following benefits:
* It separates the search criteria from the rest of the configuration, which could be useful for security reasons, or to allow for easy or frequent changes to the criteria.
* It allows users to specify the value of the search criteria every time they run the **Action**.
* The choice of the search criteria being can be based on the selected **Trading Partner**.
### Configuring Autosearch
1. **Designer** will already be open. If not, open the **Statelake** module **Designer** for the selected configuration. An expanded structure tree is displayed on the left side of the screen.
2. Click on the **DB Definition** named **Exo: Invoices Out** to open it.
3. Click on **Design** to open the definition designer canvas.
4. Click on the **Search** tab on the **DR_TRANS** dataview. This opens the **Query Designer** window on the **Search** tab.
5. The field **DR_TRANS.ACCNO** appears twice in the **Criteria** pane – once with a value of <>0, and again with a value of =**1**. Remove the **Value** of **1** for the 2nd occurrence, and then tick the check box for **AutoSearch** on that line. The equals sign will stay visible as this is the default value.
6. Click on **OK** to save.
7. Select **File Close** on the definition canvas.
8. Select **Save** on the **DB Definition** window for **Exo: Invoices Out** to save this change.
### Running Autosearch
You should currently be on the expanded structure tree home screen.
1. Click on **Export Invoices From Exo** under **Actions** to open it, then click on the **DB Definition** listed under the **Data** tab, called **Exo: Invoices Out**.
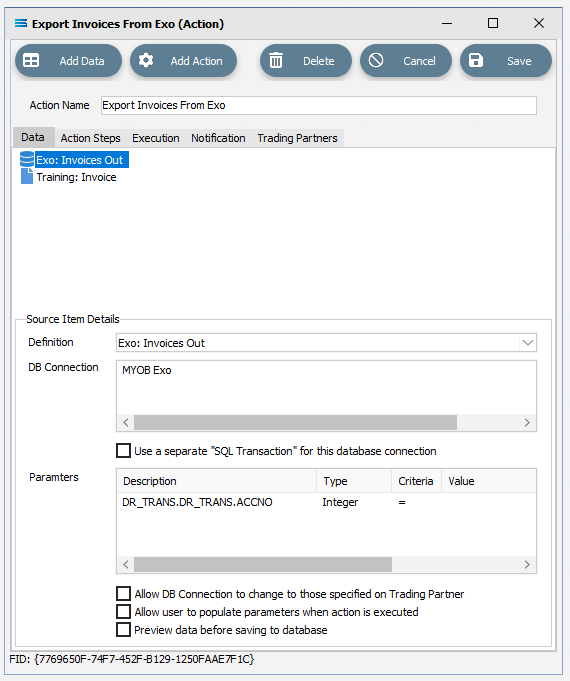
2. You will notice in the lower pane that appeared labelled **Source Item Details**, that **DR_TRANS.ACCNO** search criteria is now displayed under **Parameters**. This is now available for user input because of the change that you made in step 4 above in Configuring AutoSearch, where the **AutoSearch** button was ticked. Because **AutoSearch** was selected, the user is now allowed to enter the criteria here. Or alternatively, the search criteria can be entered when the **Action** is executed by ticking the checkbox labelled **Allow user to populate parameters when action is executed**. For the purposes of this tutorial, tick this box.
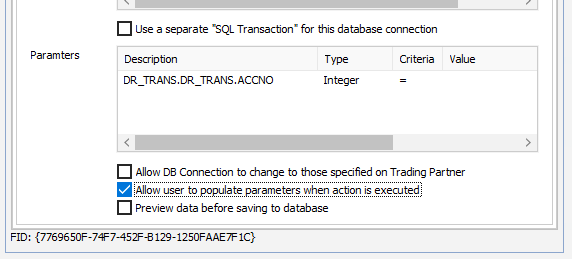
3. Click on **Save** to lock in the change you have made, and save and close the module.
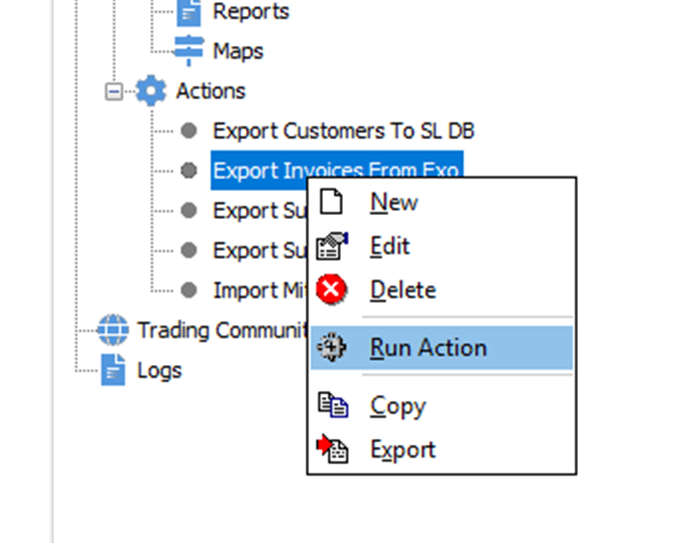
4. Now right-click on the **Action** called **Export Invoices From Exo**, and select **Run Action**.
5. As well as beginning processing and displaying the log, once the process gets to the point where the field is required then a **Provide Runtime Criteria Values** window will pop‑up. Processing will suspend until you respond.
6. The **Value** column for **DR_TRANS.DR_TRANS.ACCNO** will be blank in this pop-up window. Click into the **Value** column, and enter your search criteria – in this case it will be the number **4**. Enter 4, tab out of the column, then click **OK**.
7. The **Action** will resume processing, and you will see the displayed log file populate with additional processing lines.
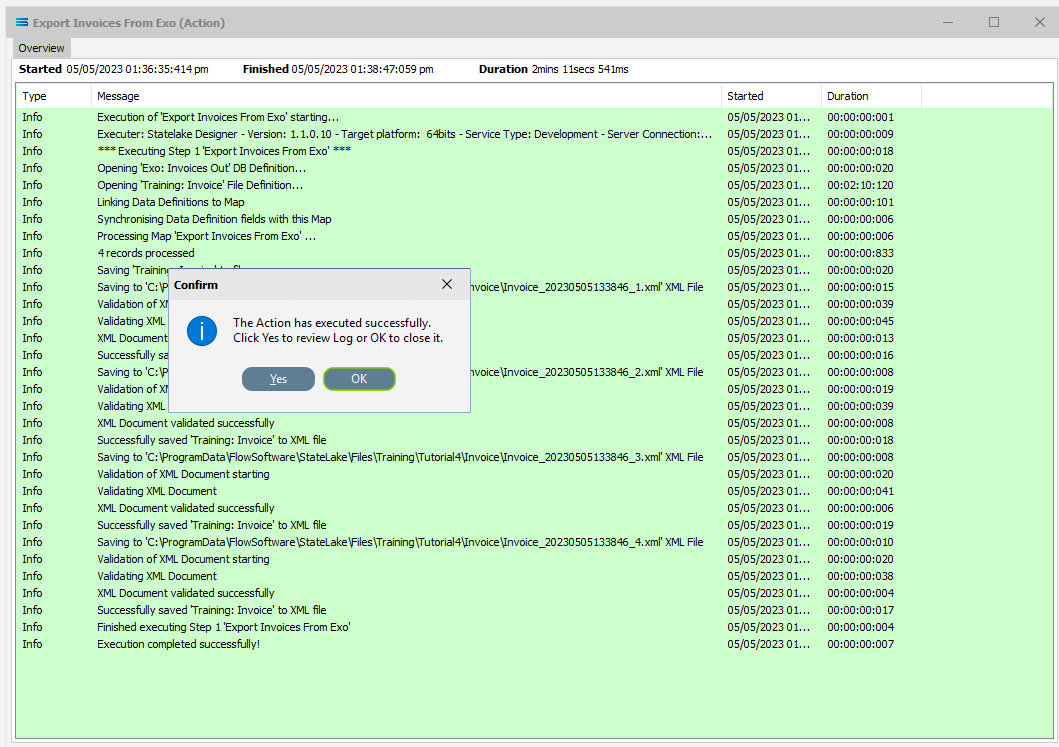
8. Click on either **Yes** or **OK** to close the **Action execution notification** window and close the log.
::: info
Before closing the **Log**, if you take a note of these invoice XML file names and the folder that the files have been written to, you can navigate to the folder and view the contents for any one of the files just written. You will see they are all for customer #4, **THE CAR JUNCTION**.
:::
Yes, it really is that simple.
## Trading Community And Trading Partners
The **Trading Community** and **Trading Partners** features illustrates the flexible reusability and power of **Statelake**.
Let’s say that there are multiple customers of the company that we are using for this tutorial, who all accept and process the same type of style and format for digital invoices. The existing **Action** named **Export Invoices From Exo** can be used to send invoices to all of these customers.
With Trading Community, we can set up each of these customers under the **Trading Partners** umbrella, and use the one **Action** to generate and send invoices to all of them - without modification to the **Action**, and without the need to create separate **Actions** to accommodate each individual customer.
For this tutorial we will use three debtor accounts:
* **KNIGHT NICOL AUTOS** (account number 1)
* **THE CAR JUNCTION** (account number 4)
* **D & C PANELBEATERS** (account number 5)
### Create Trading Partners
1. To add a new **Trading Partner**, click on the **Trading Community** item near the very base of the structure tree to open the window, and click **New** in the **Manage Trading Community** window.
2. The **New Trading Partner** window will pop-up. There are several tabs in this window. Under the **General** tab, the following information is to be entered:
1. **Partner Name** - for the first customer **KNIGHT NICOL AUTOS**, enter a meaningful but truncated version of their name. We will use **Knight**.
2. **Partner Type** – they are a customer so click the **Customer** radio button.
3. **Your ID for them as customer** – the customer number, so enter **1**.
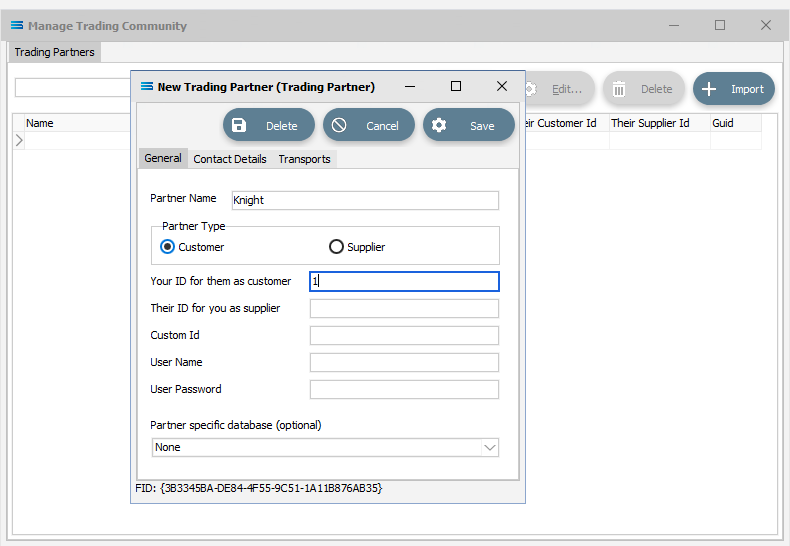
3. Select **Save** to save and close the window. On return to the **Manage Trading Community** window, you will see that a **Trading Partner** named **Knight** has been added to the list.
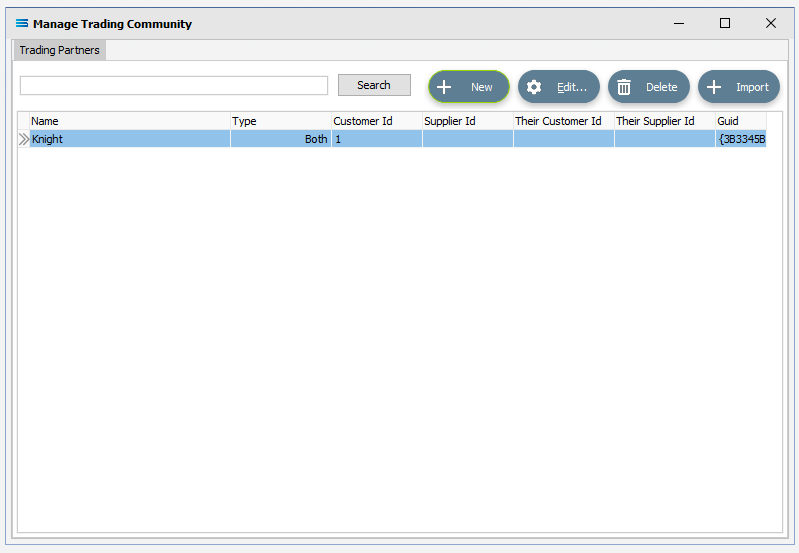
4. Repeat steps 2 through 4, adding **THE CAR JUNCTION** as **Car Junction** and **ID** #4, and adding **D & C PANELBEATERS** as **D\&C** with **ID #5**. With each successful save, their names will be added to the list in the **Manage Trading Partners** window, sorted alphabetically.
::: info
There is no verification lookup on the **Trading Partner** window. If you make a mistake, then **Statelake** will not tell you with an error message. However, if you notice that you have made an error, simply highlight the **Trading Partner** line and click **Edit** and make your change. Else highlight the line concerned and click **Delete**. You can also delete the line by double-clicking on it.
:::
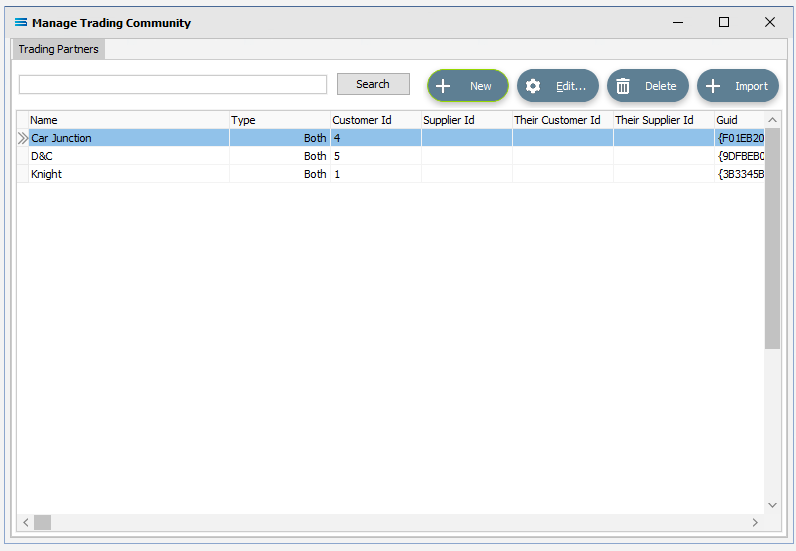
5. Once the **Trading Partners** are on the list, they are automatically saved, so to close the **Manage Trading Community** window, just click the **X**.
How easy is that?
## Using Trading Partners In An Action
To set up an **Action** to work with the **Trading Partners**, first open the **Action** that you are wishing to run.
### Open The Action
For this tutorial, open the **Action** called **Export Invoices From Exo**.
1. Click on **Exo: Invoices Out** under the **Data** tab, to adjust the search criteria and take the **Trading Partners** into account. The lower section of the window will open into the **Source Item Details** pane.
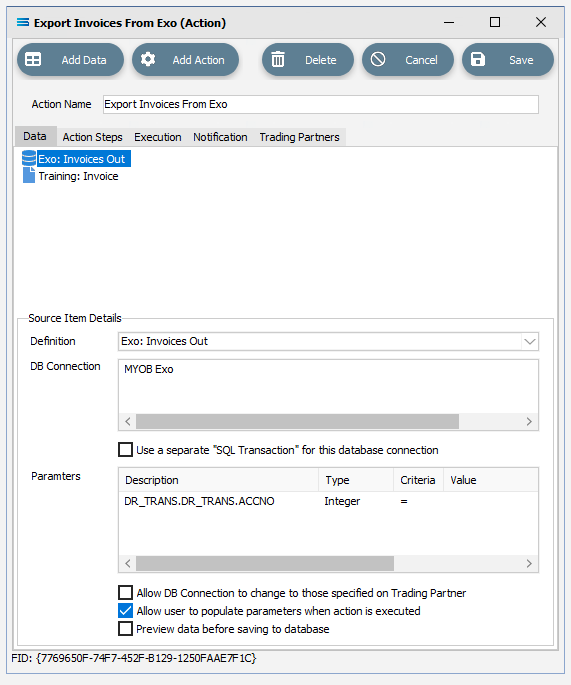
2. In the **Value** column for the **Parameters** for **DR_TRANS.DR_TRANS.ACCNO**, specify the **Criteria** to be \, including the angle brackets < and >. This is a partner tag that returns the **Customer ID**. **Tab** to get out of the column after input. The **TP** prefix to the tag, stands for **Trading Partner**.

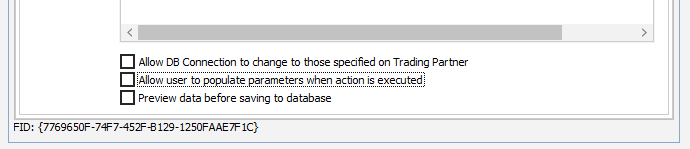
3. So that the user is not requested to input any parameters, untick the checkbox below the **Parameters** section called **Allow user to populate parameters when action is executed**.
### Select The Partners
1. Move to the **Trading Partners** tab of the **Action**, and right-click anywhere in the white space within the **Trading Partner** pane. Select **Add**, and a window will pop-up that lists the partners that you created, displayed in alphabetic order. Each partner name also displays an internal ID sequence.
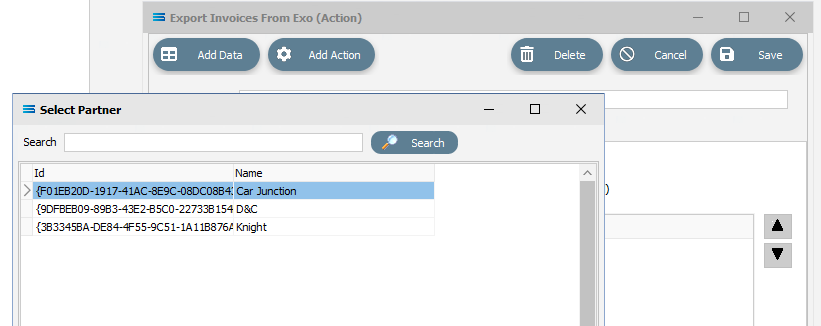
2. All 3 partners now need to be selected and added to the **Action**. To add a **Trading Partner** to the list for this **Action**, double-click on the customer that you want to include. This will add only one partner at a time and after every add you will return to the **Export Invoices From Exo** (Action) window. Start by double-clicking on **Car Junction**. The customer you have just added will appear within the **Trading Partner** pane.
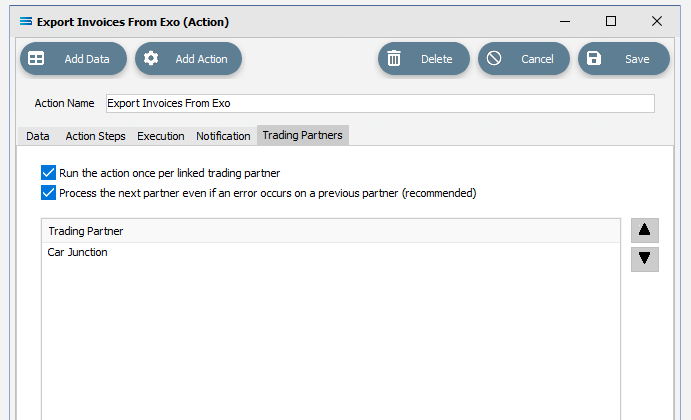
To add more than one partner, you will need to select **Add** for each partner addition by repeating steps 5 and 6 as required.
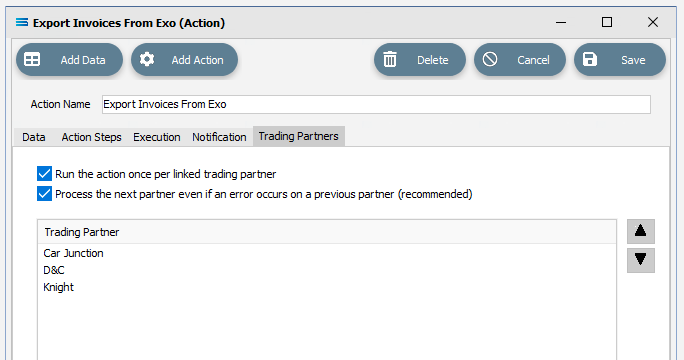
3. Once all three **Trading Partners** have been added, select **Save** to save and close the **Action**.
### Specify Individual Output Folders
To direct the output invoices into their own unique partner-specific folder, now select **Training: Invoice** from the **File Connection** list.
1. Click once to open it. Change the **File Directory** field to include the \ tag. The field will now be \\Training\Tutorial4\\\\Invoice\\. Adding this tag inserts a folder name into the path and drop the files down one level. Tab to exist the field.
::: info
As soon as you tab out of the **File Directory** field, the **Audit Directory** and **Error Directory** fields will automatically be updated.
:::
2. Now alter the **File Name** field to include a tag to write the **Trading Partner** name as part of the file name. When the **File Connection** was initially created, you entered **Invoice\_\\_\.xml** as the **File Name**. Now you will need to change this to be able to write a file that includes an **invoice number**, **customer ID**, **customer name**, **date stamp** and **file number** in the **File Name**.
3. Change the contents of this field to:
The contents in the field will scroll to the left as you enter – to check your progress use the left and right arrow keys to move within the field. As a result of the **Action**, files should be produced that look like this example: **Invoice\_#10013\_#4_Car Junction_20220507124034_2.xml**
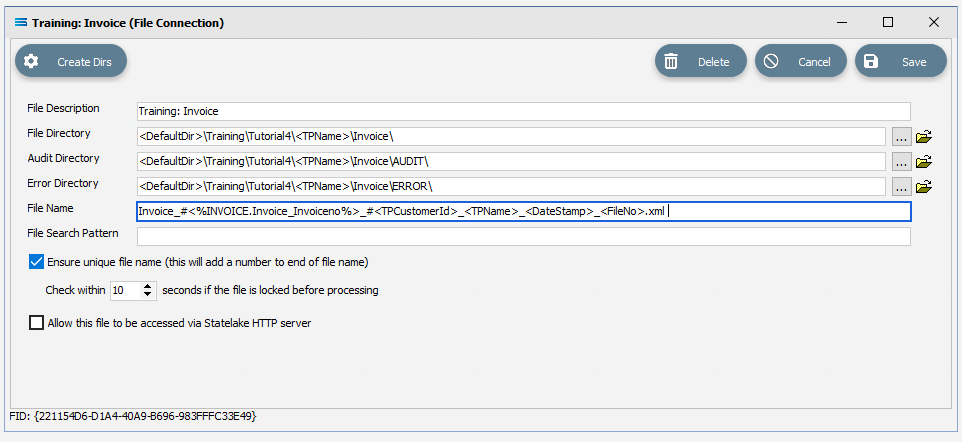
4. Tab out of the field, then select **Save** to save and close the **File Connection** window.
### Run The Action
1. Now, back to the **Action**. Right-click on **Export Invoices From Exo**, and select **Run Action**.
2. The **Action** will quickly process, and once complete will present a confirmation pop-up.
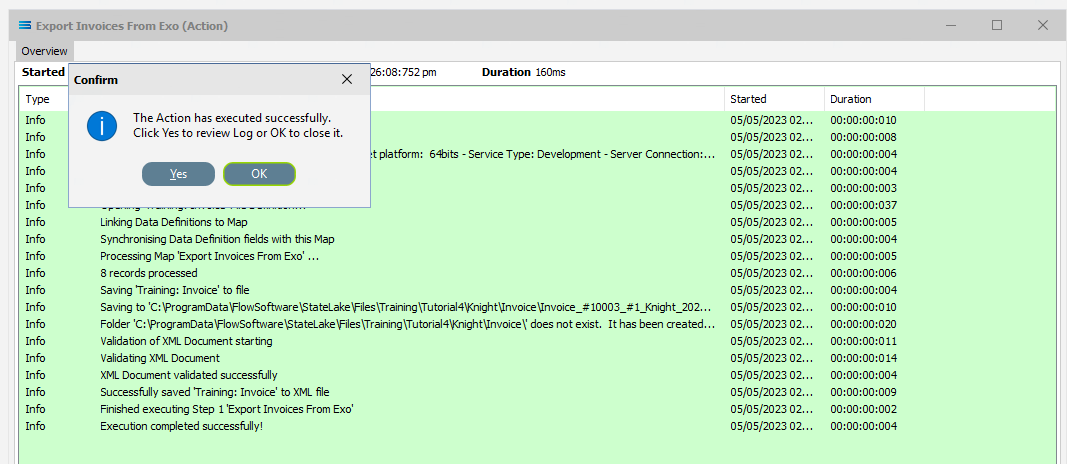
Select **OK** or **Yes** to proceed.
3. Once the on-screen preview log has closed, click on **Logs** at the very end of the structure tree. The **Log** listing will show that the **Action** successfully completed running three times – one for each of the **Trading Partners**.
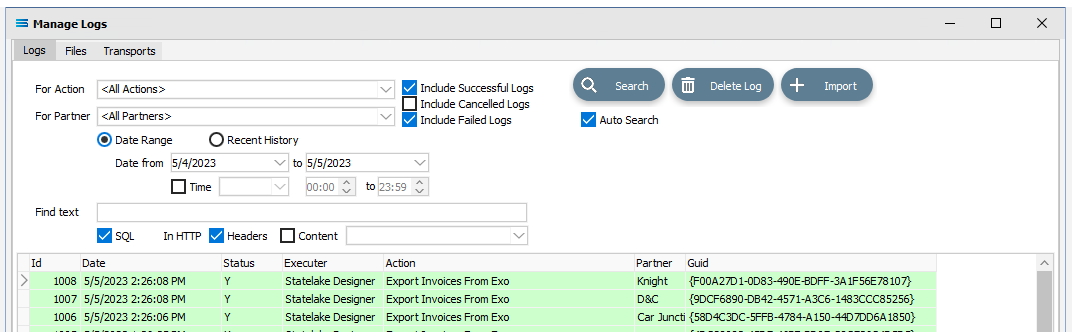
4. To see any cancelled logs, tick the box labelled I**nclude Cancelled Logs**. Successful logs will display with a **GREEN** background, failed with a **PINK** background, and cancelled logs with a pale **YELLOW** background.
5. Click on the **X** to close **Manage Logs**.
As a check on the success, navigate to the **Tutorial4** folder as specified in the **File Connection**, and you will see that there are three additional sub-folders – one for each partner that was specifically created.
And the invoices are located each of these inside under another folder named **Invoice**.
## Outbound Transports
**Outbound Transports** facilitate the transfer of files from the **Statelake** environment, to a remote environment or other system. A typical example that illustrates the use of **Outbound Transports**, is where EDI is used between **Trading Partners**.
As an example, where a supplier is sending electronic invoices to a company such as Mitre 10. **Outbound Transports** will only transport files, and not databases or tables.
The **Outbound Transports** functionality is demonstrated through the use of a **LAN** as the transport solution.
**Outbound Transports** can be found under the **Transports** umbrella on the structure tree on **Designer**.
### Create The Transport
1. Follow the path **Configuration > Components > Transports**.
2. Double-click on **Transports** to expand it, then right‑click on **Outbound Transports** and choose **New** from the drop-down list. When presented with a further selection, click **LAN**.
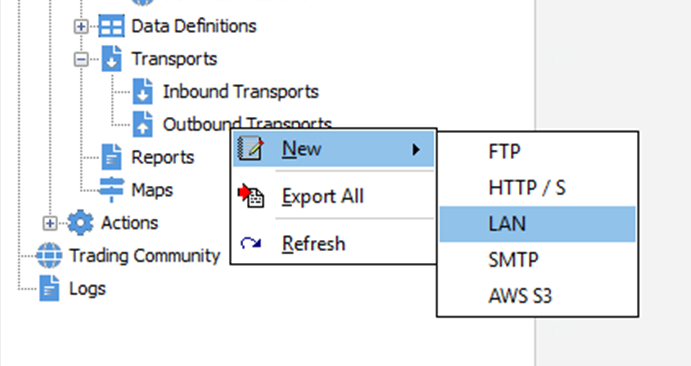
3. A **New LAN Transport** item appears in the structure tree under **Outbound Transports**. In the **New LAN Transport** window, specify the following details:
1. **Description** - a meaningful explanation for this transport. Enter **Knight Invoices**
2. **UNC Path** - the sub-directory which will contain the files. For the purposes of this tutorial enter \ProgramData\FlowSoftware\Statelake\Temp.
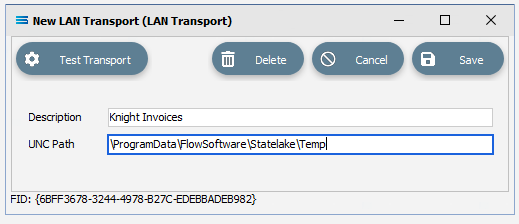
4. Select **Save** to save and close the **New LAN Transport** window.
### Select The File Connection For Transport
1. Now click on **Trading Community** on the structure tree, and select **Knight** from the **Trading Partners** list, once it is highlighted, then click Edit.
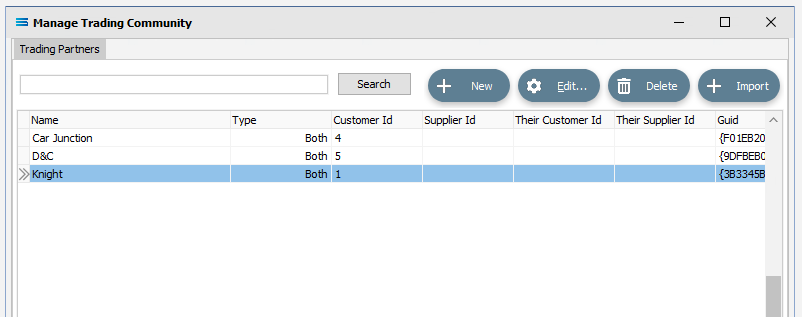
.
2. The **Knight** (**Trading Partner**) window will open on the **General** tab. Move to the **Transports** tab, and click on **Training: Invoice** in the **File Connection** list.
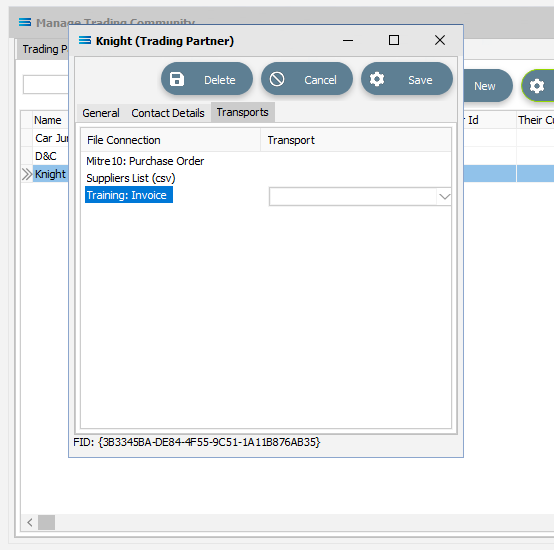
3. A list of available **Transports** will appear as a pull-down list. Click on the down arrow to reveal all of the choices. Select the newly created **Knight Invoices**, to activate the use of the **LAN** connection for this **Trading Partner**.
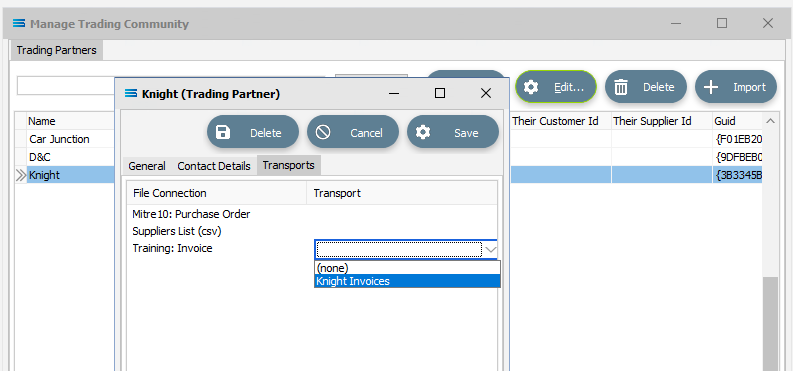
4. Select **Save** to save and close the **Knight** window.
5. Close the **Manage Trading Community** window by clicking the **X**.
### Run The Action
1. Click on **Actions** or click on the plus sign to the left of **Actions** to expand the tree. Right-click on **Export Invoices From Exo**, and select **Run Action**.
2. The **Action** will quickly process, and once complete will present a confirmation pop-up. Select **OK** or **Yes** to proceed.
3. Once the on-screen preview log has closed, click on **Logs** at the very end of the structure tree. The **Log** listing will show that the **Action** successfully completed running three times – one for each of the **Trading Partners**. It looks no different from the previous run.
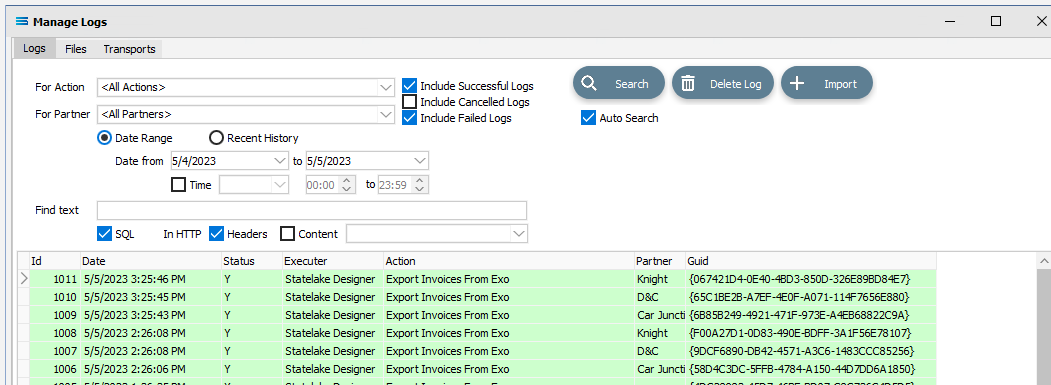
However, if you then double‑click on the log for **Knight**, you will see near the bottom of the log that the **Action** has successfully written to the **LAN** folder.
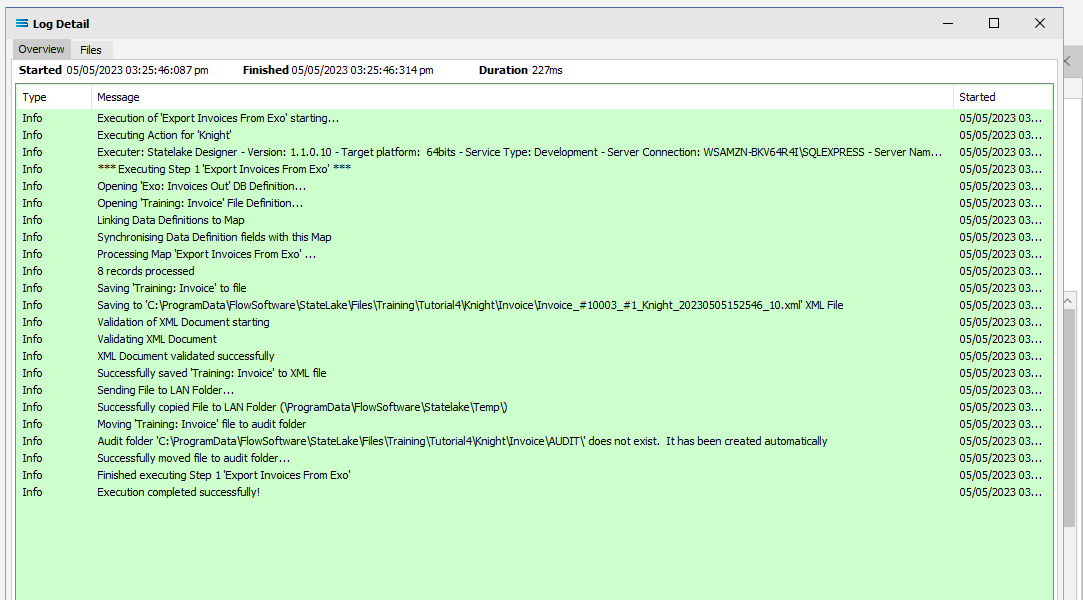
Click on the **X** to close the **Log Detail**, then on **X** again to close the **Manage Logs** window.
4. As a check on the success of the **Outbound Transports** to the sub-directory, navigate to the \ProgramData\FlowSoftware\Statelake\Temp folder, and you will see that an XML invoice file has been written for the customer **Knight**, just like the example below.

## Marking Transactions As Extracted
No-one likes to be charged more than once for something, so it is important to know which invoice records have been extracted and invoiced, so that they are not extracted again in error and a duplicate invoice raised. **Statelake** handles this with ease, by using a field named **X\_FLOID**. This is an ID field.
### Marking Transactions
**Designer** will already be open. If not, open the **Statelake** module **Designer** for the selected configuration. An expanded structure tree is displayed on the left side of the screen.
### Set The DB Definition Criteria
1. Click on the **DB Definition** called **Exo: Invoices Out** to open the definition window.
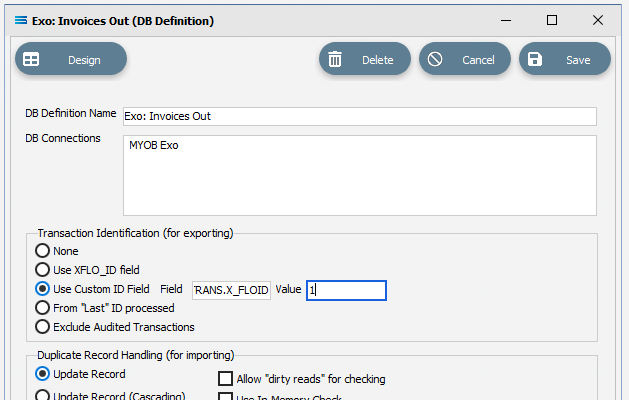
2. Under **Transaction Identification** (**for exporting**) section, click the **Use Custom ID Field** radio button, and enter the following details:
1. **Field** – an additional field used to reflect extraction status. Enter **DR_TRANS.X_FLOID**
2. **Value** – the value to identify the record as extracted. The field is to hold a value of 1 when the record has been fully processed. Enter **1**.
::: info
When an invoice database record has **NOT** been processed, the value held in **DR_TRANS.X_FLOID** is set to minus 1 (-1). To indicate that an invoice has already been generated for the record (we do not want to duplicate the invoice), this **DR_TRANS.X_FLOID** value is therefore set to 1 one (**1**).
:::
3. Click **Design** to open the designer canvas which will be populated with the three dataviews.
4. Open the **Query Designer** by clicking the **Tables** tab for the dataset **DR_TRANS**.
5. On the grey label bar, tick the checkbox to **Update Custom ID** Field.

6. Move to the **Fields** tab and expand the lower pane as required, so that **SEQNO** is showing as one of the **Selected Fields**. Click on **SEQNO** to highlight the line, then change the **Field Type** from **Standard** to **Primary Key** using the pull-down box.

7. Then move to the **Search** tab and modify the search criteria for the field **X\_FLOID**. This field has already been selected and should appear in the lower pane with the **Show All** set to **Yes**:
1. Click on the line in the lower pane, then click the **Show All** box to untick it.
2. Enter -1 into the **Value** column for that line.

::: info
This will ensure that once the record is processed, and the **X\_FLOID** value is returned to a one (**1**), then the record will not be included in the query results again. So the record can only be extracted once.
:::
8. Click **OK** to save and close the **Query Designer**.
9. Select **File** and **Close** to save the definition and close the designer canvas.
10. Save the definition using the **Save** button.
### Run The Action
1. Return to the **Actions** branch on the structure tree, and right-click on **Export Invoices From Exo**, and select **Run Action**.
The **Action** will quickly process, and once complete select **OK** or **Yes** to proceed.
2. Once the on-screen preview log has closed, click on **Logs** at the very end of the structure tree. The **Log** listing will show that the **Action** successfully completed running three times – one for each of the **Trading Partners**.
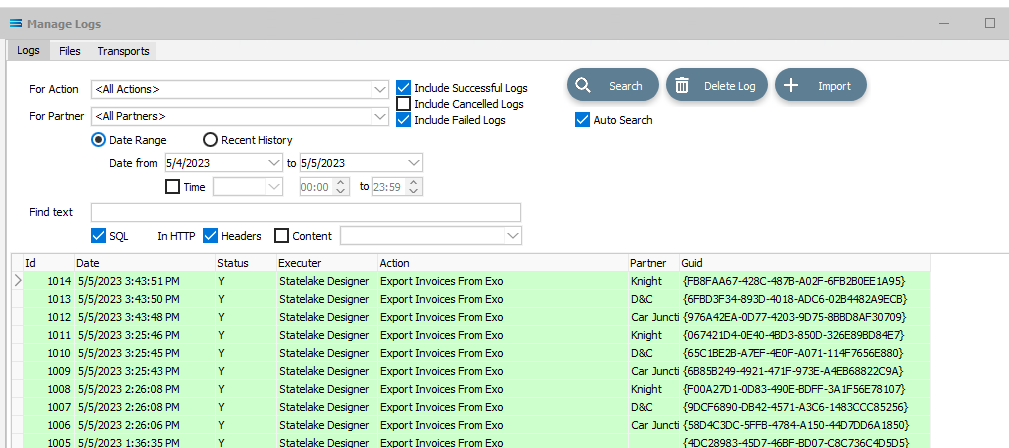
3. However, now each record has been flagged as extracted, so no further extraction of these records will be possible. Remember that when a record has been processed and an invoice generated, the DR_TRANS.X_FLOID will be set to 1 - indicating the invoice has already been generated.
4. Close the window by clicking on **X**.
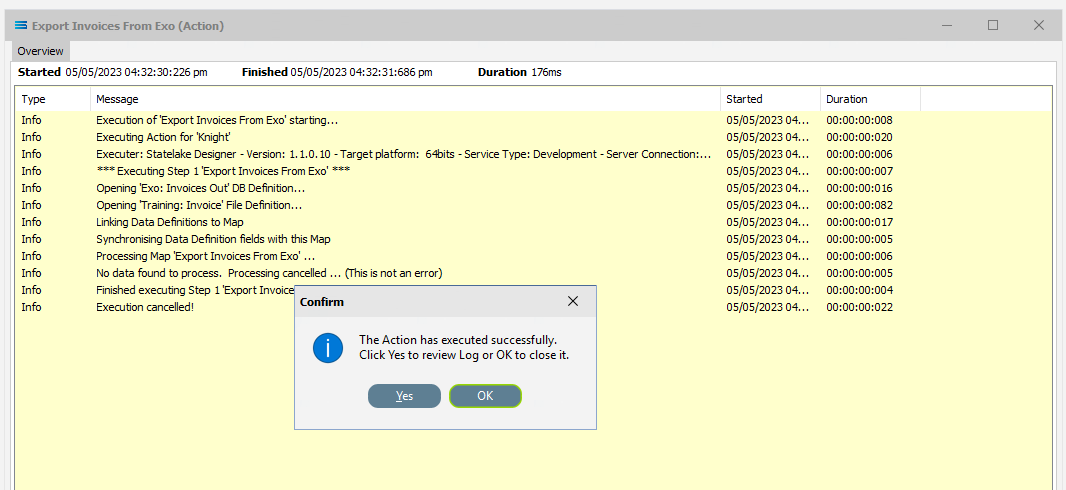
As a test of this, run the **Action** again, and you will see that there will be no further processing of these records. The yellow **Log** background shows that the **Action** was **Cancelled** to to finding no records to process - they have been been flagged as already generated.
## Summary
Congratulations! A two-level XML has now been generated from a multi-tier database source query. And you have proven your skills as a **Statelake** **Tag** titan!
In summary these are things that have been achieved for this configuration in this tutorial:
1. XML **File Definitions** have been configured to writing to XML files to generate invoices.
2. **Tags** have been introduced. A full list of usable tags is available on the online **Statelake** help.
3. **Trading Partners** and the **Trading Community** have been used.
4. The use of **Outbound Transports** to achieve your goal.
5. How to flag records as extracted to avoid duplications using **X\_FLOID**.
## Quick Recap Quiz
Your adventures into the extensive functionality of **Statelake** continues. How good is your memory? These are some tricky questions.
1. Schema files (.xsd) are linked to what other type of file?
a. Flat file b. EDIFACT c. XML
\2. Enabling users to enter their own criteria during a search operation employs which function?
a. AutoSearch b. Interactive Search c. Stab-in-the-dark
\3. What is the **Statelake** module that specifies database names, and access credentials?
a. DB Definition b. DB Connection c. File Connection
\4. Which **Statelake** module allows a file to be sent to a remote location?
a. Maps b. Outbound Transports c. Trading Community
\5. The variable that is used to substitute dynamic values in a screen form?
a. Interloper b. Earmark c. Tag
\6. What is the name of the highest node in a tree structure?
a. Root node b. Leaf Node c. Fat Branch
\7. The **Statelake** Map defines how the output is to be created. What can a Map not do?
a. Change the output structure b. Calculations c. Output records
\8. Which items can be used to represent external entities such as customers?
a. DB Connections b. Trading Partners c. Outbound Transports
\9. After being first written, how many times can a **Log** file be re-opened and reviewed?
a. As many times as required b. None c. Only once
\10. Can **Statelake** produce multiple output files in one run?
a. Yes, but with difficulty b. No c. Yes, easily
\11. Script variables are used to powerful effect in which **Statelake** module?
a. Action b. Map c, Transports
\12. A symbol that is used in formulae, expressions, or calculations, is called what?
a. Operator b. Server c. Key
13, What **Statelake** program allows you to define a configuration database service?
a. Designer b. Manager c. Monitor
14. What is the correct **TRANSTYPE** for an invoice?
a. 1 b. 2 c. 3
## Next Steps
This tutorial is the final in the initial series, and bring together all of the things you have learnt so far, while introducing some new and exciting functions.
You are fast becoming familiar with the incredible versatility and power that is **Statelake**.
The following additional tutorials build on the knowledge foundation so far, and introduce some more exciting features.
* **Tutorial 5 - Statelake Magic SQL**
* **Tutorial 6 - Import CSV Purchase Orders Into A Database**
* **Tutorial 7 - Exporting And Importing Configuration Data**
* **Tutorial 7 - Exporting And Importing Configuration Data**
::: details Quick recap quiz answers
1. c 2. a 3. b 4. b 5. c 6. a 7. a 8. b 9. a 10. c 11. b 12. a 13. b 14. a
:::