Tutorials: Before you start
Unlike the “Hello World” Introduction tutorial, the following tutorials require some extra preparation.
These instructions describe how to copy the training sample files, and how to set-up the Statelake configuration DB that will be used extensively during the following tutorials.
To enable you to become familiar with the steps involved in the creation of a Statelake configuration, it is necessary to prepare your computer by copying several sample training files onto your computer.
There are two ( 2 ) ways of obtaining these training files.
Download The Training Files
The recommended option is to simply download the files using the links provided on the Tutorial Resources page.
C:\ProgramData\FlowSoftware\Statelake\FILES is the DEFAULT Data directory that is referred to as <DefaultDir> throughout the tutorials.
C:\ProgramData\FlowSoftware\Statelake\SCHEMA is the DEFAULT Schema directory that is referred to as <DefaultDir> throughout the tutorials.
Make sure to create the following sub-directories -
C:\ProgramData\FlowSoftware\Statelake\FILES
C:\ProgramData\FlowSoftware\Statelake\FILES\CSV Orders
C:\ProgramData\FlowSoftware\Statelake\FILES\Mitre10 Orders
C:\ProgramData\FlowSoftware\Statelake\FILES\Mitre10 Stock List
C:\ProgramData\FlowSoftware\Statelake\SCHEMA
C:\ProgramData\FlowSoftware\Statelake\SCHEMA\Mitre10
C:\ProgramData\FlowSoftware\Statelake\SCHEMA\Training
Then copy the example downloaded data files unto the appropriate sub-directory, as per the following schedule.
Along with the 3 sub-directories, C:\ProgramData\FlowSoftware\Statelake\FILES should also contain the following files -
Statelake Magic - (DB Definition).SL_CFG
ImpEx Test Config - (Action).SL_CFG
SL Action Map - (Action).SL_CFG
Statelake Group Export - (Actions).SL_CFG
Sub-directory \CSV Orders - should contain the files called -
PO_41919.csv
PO_41920.csv
Sub-directory \Mitre10 Orders - should contain the files called -
M10 Order.xml,
M10_41919.xml
M10_41920.xml.
Sub-directory \Mitre10 Stock List - should contain the file called -
Items.csv
Along with the 2 sub-directories, C:\ProgramData\FlowSoftware\Statelake\SCHEMA should also contain the following files -
Sub-directory \Mitre10 - should contain the file called -
PurchaseOrderFull.xsd
Sub-directory \Training - should contain the files called -
Customers.xsd
Invoice.xsd
InvoiceMulti.xsd
Order.xsd
Products.xsd
The tutorial databases can only be used with Microsoft SQL Server Management Studio at this time.
Download the SQL server data and backups into a folder that is essentially just a temp folder for the purposes of storing the database backup files prior to restoring them into Microsoft SQL Server Management Studio.
You should give this directory folder a name that does not compete with any live folders already on your system - for example a directory such as C:\MSSQL.1\MSSQL\Backup.
The files that will be copied into this temp folder are Data_Demo.bak and Statelake_Demo.bak.
Obtain The Training Files From Customer Support
Once you have received these files, copy the folder containing the example data files, named Statelake Training Resources Files, to C:\ProgramData\FlowSoftware\Statelake\FILES.
C:\ProgramData\FlowSoftware\Statelake\FILES is the DEFAULT Data directory that is referred to as <DefaultDir> throughout the tutorials.
There will be 3 sub-directories copied - \CSV Orders, \Mitre10 Orders, and \Mitre10 Stock List.
Along with the 3 sub-directories, <DefaultDir> will also contain the following files
Statelake Magic - (DB Definition).SL_CFG
ImpEx Test Config - (Action).SL_CFG
SL Action Map - (Action).SL_CFG
Statelake Group Export - (Actions).SL_CFG
Sub-directory \CSV Orders - contains the files called
PO_41919.csv
PO_41920.csv
Sub-directory \Mitre10 Orders - contains the files called
M10 Order.xml,
M10_41919.xml
M10_41920.xml.
Sub-directory \Mitre10 Stock List - contains the file called
Items.csv
Copy the folder containing the XSD schemas, named Statelake Training Resources Schemas, to C:\ProgramData\FlowSoftware\Statelake\SCHEMA.
C:\ProgramData\FlowSoftware\Statelake\SCHEMA is the DEFAULT Schema directory that is referred to as <DefaultDir> throughout the tutorials.
There will be 2 sub-directories copied - \Mitre10 and \Training.
Sub-directory \Mitre10 - contains the file called
PurchaseOrderFull.xsd
Sub-directory \Training - contains the files called
Customers.xsd
Invoice.xsd
InvoiceMulti.xsd
Order.xsd
Products.xsd
The tutorial databases can only be used with Microsoft SQL Server Management Studio at this time.
Copy the folder containing the SQL server data and backups, named Statelake Training Resources Databases, into a folder that is essentially just a temp folder for the purposes of storing the database backup files prior to restoring them into Microsoft SQL Server Management Studio.
You should give this directory folder a name that does not compete with any live folders already on your system - for example a directory such as C:\MSSQL.1\MSSQL\Backup.
The files that will be copied into this temp folder are Data_Demo.bak and Statelake_Demo.bak.
Microsoft SQL Server Management Studio
Restore Databases
The training databases that have just been copied onto your computer into your temp folder need to be restored from the backup files before they can be used. These are only available via Microsoft SQL Server Management Studio.
The training databases that are to be restored are -
Data_Demo.bak - MYOB Exo demo database
Statelake_Demo.bak - Statelake demo configuration
Open Microsoft SQL Server Management Studio.
The Server type is Database Engine, and it is fixed. Server name is the SQL installation name and will default to <YOUR‑COMPUTER>\SQLEXPRESS. Enter your login and password, and select Connect.
The Object Explorer screen will open, with a file structure running down the left margin. If you want to see what is there under database, you can expand the selection by clicking on the plus symbol beside Databases, but it is not essential. Next, right-click on Databases, then select Restore Database from the drop-down selection.
The Restore Database window will open. The first section allows you to specify the source – whether it is an active live database or another device such as a backup file (.BAK) as in this tutorial. As we do not want Database, click on the Device radio button. Click on the three dots button tp the right of this field to bring up the Select backup devices window.
Backup media type should default to File. To select the file that is to be used, click the Add button to the right of the window.
The Locate Backup File window opens, with a split left and right screen. The screen on the right shows the contents of the selected directory that appears in the left pane. In the left pane, navigate to the directory that holds the backup file to be restored (the temp folder as above), and click on the directory name to place the contents list on the right-hand pane. For these tutorials the file is Data_Demo.bak. Click on the file to highlight it, then select OK.
You will return to the Select backup devices window, and the file should appear in the section Backup media, including the full path name.
Do not be tempted to add any other files - just restore ONE FILE at a time.
Click OK.
Your file selection is then populated into both the source and the destination section of the Restore Database window. Statelake will assume that the name of the restored file will imitate the source file, so the name Data_Demo will appear in the Database field. This name can be changed as required.
Restore to is to be left as the default.
The section Restore plan is automatically completed and is to be left as set. The Restore tick box will be ticked.
Ignore the Verify Backup Media button. Click OK to continue.
A successful restore will prompt a message to that effect. Click OK to continue and return to the Object Explorer screen.
Confirming the presence of the file you have just restored, Data_Demo should now be listed as a valid database. If Databases is not expanded, click the plus symbol just to the left. If Data_Demo is not displayed, navigate to Databases and right-click on Refresh on the drop‑down menu.
Now repeat these steps to restore the Statelake_Demo.bak backup to Statelake_Demo database, starting by ight-clicking on Databases, then selecting Restore Database from the drop-down selection.
As a result, you should have these two new databases in your list of databases.
Microsoft SQL Server Management Studio should remain open.
Create A New Configuration Database
This configuration database will hold information relating to the design of the configuration which includes DB Connections, File Connections, Maps, Logs and other Statelake components.
Setting Up The Database
If Microsoft SQL Server Management Studio. has been closed, re-open it. At the Object Explorer screen, right-click on the tree menu item Databases, then select New Database from the drop-down selection.
The New Database window will open, and be split into two panes. In the right-hand pane, enter the Database Name as Statelake_Training. You will notice that this information automatically populates into Database files section below. This is the only information that needs to be input. Then click OK.
Do not click the Add button. Using Add will create a data file which is not necessary.
A successful completion will return you to the Object Explorer screen. The database you have just created, Statelake_Training, should now be listed as a database. If Databases is not expanded, navigate to Databases on the tree menu, and click on the plus symbol to the immediate left to expand and display the current configuration databases. If the database you have just created does not appear to be listed, right-click on Databases, then select Refresh on the drop-down menu. Or you can simply select the Refresh symbol on the Object Explorer menu (or F5). Statelake_Training should now be listed, along with Hello_World (if you done the tutorial), Data_Demo, and Statelake_Demo.
Close Microsoft SQL Server Management Studio.
Set-up The Configuration DB
Statelake Manager is the top-level, umbrella executable application that enables you to create new configuration databases; access existing configuration databases; open and run Designer, and Monitor.
Start Manager. If the Manager icon is not found on your desktop, the Manager executable Manager.exe can be found in C:\Program Files\Flow Software\Statelake. Double-click on the desktop icon or the application to run.
The Manager home screen window will open. It is split into 2 distinct parts. On the left side are the selection bars for Home and Config Databases, and in the right panel the options for each selection are shown.
Create A New Configuration Database
On the left-hand side of the Manager window, click on Config Databases. You may see existing configurations listed such as Hello World, but for a new Statelake user, this list may well be empty.
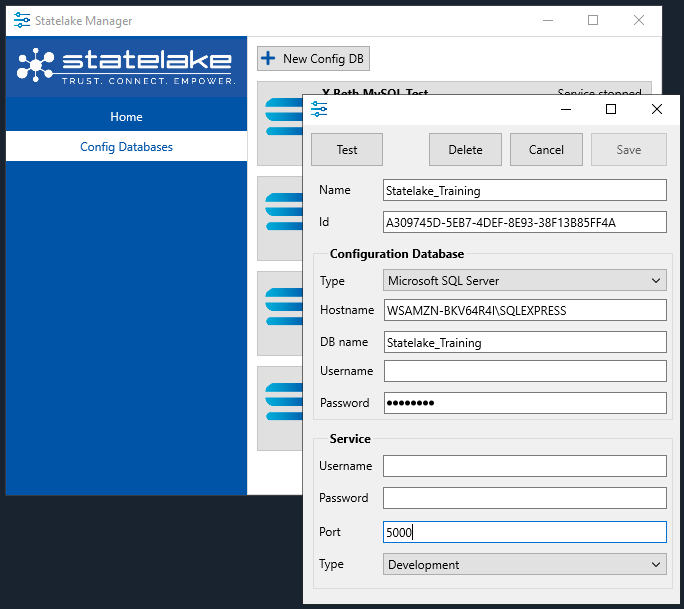
To create a new configuration, click on the New Config DB button, and a new window will open, allowing you to identify the database and set the login credentials.
Name - the title that this configuration will be known by which defaults to New Config DB. For this tutorial, replace this default value with Statelake_Training. Although this name has been chosen to match the database name, this is not essential, and it can be changed to make it more meaningful. It is simply the name of the menu item for this set of connection details.
ID - an auto-generated unique identifier and is fixed.
Under the Configuration Database section, Type is defaulted to Microsoft SQL Server.
The Hostname is the name of the server where the database is being hosted and is the server name that was entered during the login to Microsoft SQL Server Management Studio. So you would enter the appropriate name which would be either <YOUR‑COMPUTER>\STATELAKE or <YOUR‑COMPUTER>\SQLEXPRESS.
DB name – the name of database which was created in studio which is called Statelake_Training as per step 3 above.
Enter your Username and Password, as used with studio.
You can leave the username and password blank to use Windows authentication for logging in to the MS SQL Server.
Although Port and Type are under Service, it is necessary to select a port and Type before proceeding further. and before testing the connection.
Port - the Port should be a unique number for the machine running the configuration. In a new configuration, the system will assign the default value 5000 to this field, and in this case, we will be attempting to save the configuration with this default value.
Type - select the appropriate Type from the pull-down list. For this tutorial, select Development.
Press the Test button to ensure that your selection is valid. You cannot Save the configuration until you have run this test procedure. The system will attempt to connect to that database on that host with the entered credentials. A successful test will display a “Successfully connected to the database” message. However, the test will fail if the information in any field is incorrect. Click OK to close the message. Correct any fields as necessary, then click on Test again.
As a check for incorrect entries, look at the server connection data and check for any typing errors. Check to see whether CAPS LOCK may be on, and make sure that the database name exists.
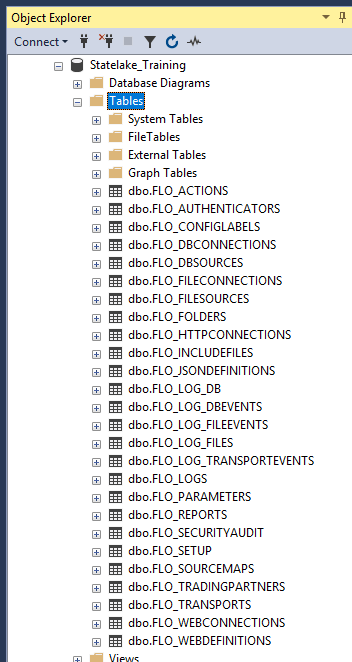
Before this step was completed, there were only the standard Windows tables in the Statelake_Training database, but through this process, Statelake has now added several Statelake specific tables. These additional tables will be used to save the components you will build as you work through this tutorial,
Service runs elements of a configuration as a background process. It is not necessary to enter the username or password details for the service for this tutorial.
Once a successful test has been confirmed, click the Save button at the top right of the screen. Statelake will check the validity of the Port upon Save. The Port should be a unique number for the machine running the configuration. It is an arbitrary number that is not in use by any other system process, utility or common program. It is recommended that a number over 5000 is selected. Unique numbers must be selected for each configuration, such as 5010 for a production port and 5011 for a test port. But ports cannot be duplicated, so if the Port value entered on the configuration is deemed to already be in use on another Statelake Configuration, you will see the error pop-up “Current port has been used”, and Statelake will prompt for an automatically assigned and available port value to be selected. In a new configuration, the system will assign the default value 5000 to this field, and in this case, we will be attempting to save the configuration with this default value. For this tutorial use 5002. If you are prompted to apply a change due to a duplicated Port, click YES.

On Save you will see several User Account Control windows pop-up – “Terminates Processes”, and “Service Control Manager Configuration Tool” twice. Reply Yes to all 3. You will then return to the Manager window.
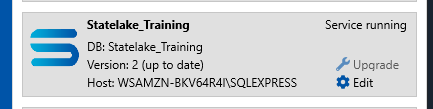
Statelake_Training will appear on the right of the window as a current Config DB.