The Target Environment Space
The target environment space should be ready to receive data - any configuration databases to be transferred should have been backed up, and any peripheral files manually copied.
Where required please liaise with your technical advisor and/or system administrator.
Let the transfer begin . . . .
Step 7 - Restore Configuration Database
Each database to be transferred has its own backup file, and these will require to be individually restored onto the target database server.
Depending on the configuration being restored, the Log data may be quite extensive.
Any database manipulation will require the appropriate access and system privileges.
Step 8 - Copy Peripheral Files
Any manually copied Statelake files should now be copied into the appropriate sub-directories on the target environment space.
Such as -
XML schema definition files (.xsd)
File-based Include or Script files (.inc)
Schema files should be copied into the \Schema\ sub-directory under the data directory.
Include files should be copied into the \Script\ sub-directory under the data directory.
Step 9 - List Of Connected Configurations
Statelake Manager includes a list of connected configurations.
On a new Statelake installation, there will be no connected configurations listed yet, as shown below

But there is no cause for concern - even if the source environment may have contained multiple Statelake config databases - and now in the target environment there are none.
The configuration database connections are simply re-built in this target space by selecting New Config DB and entering the connection details for each configuration in turn, into this target environment.
It is not necessary to use the same name in the target environment, as the source environment.
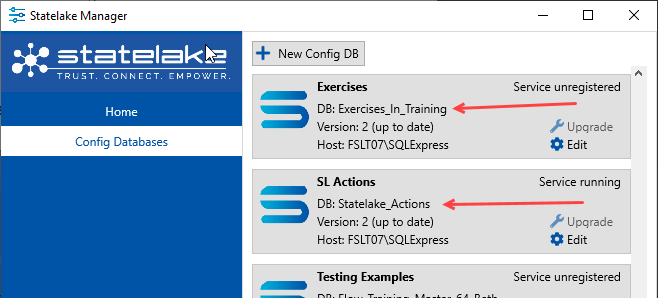
For example, in the source environment there were two (2) configuration databases that have been transferred to the target environment -
Exercises that was connected to the configuration database called Exercises_In_Training
SL Actions that was connected to the configuration database called Statelake_Actions
A New Config DB connection could be created and rather than call it Exercises, it could be called New Exercises.
And as long as New Exercises pointed to the Exercises_In_Training configuration database, then New Exercises in the target environment would contain all of the Statelake components that existed in the source environment configuration called Exercises.
Create a New Config DB entry for each configuration database.
For more information, please refer to New Configurations.
Step 10 - System Configuration File Re-direct using AppData.cfg
As illustrated in Scenario E Transfer Statelake Onto A Different Environment, there may be the requirement to have a second Statelake installation with different program settings.
This is achieved using a file called AppData.cfg that is stored in the same sub-directory as the Statelake executables.
This file is used as a re-direct for the location of the system configuration file Config.json to be used for a particular installation of Statelake.
For instance, with Scenario E there may be a Statelake installation in the default program directory of C:\Program Files\Flow Software\Statelake\. And the program settings are stored in the default data directory of C:\ProgramData\FlowSoftware\Statelake\.
But the second Statelake installation for Scenario E is installed in a specifically created program directory called C:\Program Files\Scenario E\Extra Copy\. However unless told otherwise, this second copy of Statelake will look in the default data directory to get program settings.
To instruct Statelake when it runs that the program settings should be read from a specific location, you can use the file AppData.cfg in the same directory as the Statelake executables.
This file AppData.cfg contains the path to the location program settings to be used - e.g. it points to C:\ProgramData\Scenario E\Data\.
The program settings include the Config.json file, the license file, the default location for XML schema files, and the default location for file-based include files.
Install 1
program directory C:\Program Files\Flow Software\Statelake\
data directory C:\ProgramData\FlowSoftware\Statelake\ . . . . Config.json
Install 2
program directory C:\Program Files\Scenario E\Extra Copy\ . . . . AppData.cfg
data directory C:\ProgramData\Scenario E\Data\ . . . . Config.json
So it may be necessary to manually create an AppData.cfg in the program directory of one of the Statelake installations, enabling that particular Statelake installation to point to a different set of program settings, and therefore potentially a different selection of configuration databases.
For more information regarding the purpose and use of this file, please refer to Configuration Files - The Power of AppData.cfg.
Step 11 - Re-start Services & Statelake Monitor On Source Space
Statelake Service should be re-started as required for any items in the source environment space. This must be done by a person who has the appropriate privileges.
If Statelake Monitor was stopped in the source environment, then it can now also be re-started in the source environment space.
Open Statelake Manager to access Monitor, by clicking on Home in the left-hand panel. Monitor should not be running, and this is indicated by the Run icon being displayed.

To start Monitor, simply click on the Run icon. Monitor will then display a Stop icon and an Open icon as below.

For more information about Monitor, please refer to Monitor - Running Actions & Schedules.
Step 12 - License File
To allow Statelake to run on any new installation, the license file will need to be valid and visible to the software. The default location for the license file is within the data directory - such as C:\ProgramData\FlowSoftware\Statelake\Config\.
The license must be valid for Statelake to run. After installation into the target environment, you may find that the license that has been installed may have expired. If the license on the target environment space is not valid, you will receive a message as soon as you attempt to run Statelake Designer.

Follow any prompts that may appear as a result of this warning.
Please refer to Planning The Installation for information about the license file.
Step 13 - All Good To Go!
Once all these steps have been completed, your Statelake system should have been successfully transferred to the new target environment!